• Hail Guest!
    We're looking for Community Content Contribuitors to Stratics. If you would like to write articles, fan fiction, do guild or shard event recaps, it's simple. Find out how in this thread: Community Contributions
  • Greetings Guest, Having Login Issues? Check this thread!
  • Hail Guest!,
    Please take a moment to read this post reminding you all of the importance of Account Security.
  • Hail Guest!
    Please read the new announcement concerning the upcoming addition to Stratics. You can find the announcement Here!

[Gardening] Gardening FAQ (Last Updated 8/15/2008)

Status
Not open for further replies.

Hyssmaye

Seasoned Veteran
Stratics Veteran
Stratics Legend
Welcome to the Gardening FAQ!

Gardening is an in-game activity rather than a skill that you have to spend skill points on. Anyone can participate! Mages, Fighters, Bards, Fishing-Necro-Chefs, Herding-Tailoring-Camper-Scribes - anyone. With gardening, you can:

  • Grow 17 types of plants from the main plant system, in 12 basic colors, plain-color, 4 rare colors and 2 mutant colors
  • Grow 8 types of bonsai trees
  • Grow plants that produce resources with *special properties*
  • NEW: Grow cocoa trees that produce raw materials for chocolate-making
  • NEW: Grow 15 *new* types of plants!

==========================================
FAQ Content

1.1 Beginner's Guide to Plant Growing
1.2 Plant UIs ("Gumps") - 2D & KR Clients
1.3 All About Plant Growth
1.4 Seed Types
1.5 Plant Types, Colors & Cross-Pollination
1.6 Mutant Plants
1.7 Fertile Dirt
1.8 Resources
1.9 Vines
1.10 Bonsai Seeds & Trees by kittykat
1.11 Naturalist Quest (aka "Ant Quest") Seeds & Plants by Ambrossia
1.12 Magic Waves & Pitchers
1.13 Saving a Wilted or Dying Plant
1.14 Tips & Tricks
1.15 Xena Dragon's Guide to Gardening in Small Spaces by Xena Dragon
1.16 Links to Stratics Gardening Information
 
Last edited by a moderator:

Hyssmaye

Seasoned Veteran
Stratics Veteran
Stratics Legend
1.1 Beginner's Guide to Plant Growing

To grow a plant, you'll need the following items:

  • Seed - can be obtained as loot from Bog Things and Boglings, as rewards for completing the Naturalist Quest, or as loot on Tokuno creatures. You can also occasionally find them for sale on player-run vendors.
  • Plant Bowl - can be purchased from any NPC Provisioner for 2 gold
  • Dirt - you can get dirt from any dirt road or dirt patch
  • Water Pitcher - can be purchased from NPC Waiters and Tavernkeepers, for about 11 gold
  • Greater Potions - you can make these yourself if you have the Alchemy skill, or you can purchase them from player-run vendors. Four potion types are used for growing plants.
    • Greater Poison - rids plant of insect infestation
    • Greater Cure - rids plants of fungus
    • Greater Heal - boosts your plant's health
    • Greater Strength - may help plant resist insects/fungus, but it's not required for plant growing
Once you've gathered these items, you're ready to grow a plant!

Step 1 - Fill Plant Bowl With Dirt: First, you need to get some dirt into your plant bowl. Double-click the plant bowl, target a dirt road or any dirt patch/ground and left-click. Your plant bowl should fill with dirt. If you get a message stating "You'll want to gather fresh dirt in order to raise a healthy plant!", try moving over a bit and attempt to fill the plant bowl from a different dirt area.

Step 2 - Soften Dirt: Before you can plant your seed in the bowl, you have to soften the dirt with some water. Double-click the water pitcher, target the plant bowl and left-click. Do this a second time to get "A Bowl of Soft Dirt".

Step 3 - Plant Seed: Now you can plant your seed! Double-click your seed, target your Bowl of Soft Dirt, and left-click. Your seed will be planted in the plant bowl.

Step 4 - Tend Plant: Keep the plant bowl with your planted seed in your backpack, bank box or locked down in a house (not inside a container) to keep it growing. It will take a little more than one RL day for your seed to grow into a seedling, but after that you will have to tend your plant each RL day. To tend your plant, double-click your plant bowl. This will open up the plant's gump. You must check the gump to see whether your plant needs water or potions in order to keep growing!

If you play using the 2D client, your plant gump will look like this:


If you play using the KR client, your plant gump will look like this:


If you see a red or yellow '+' or '-' sign next to any of the indicators on the plant gump your plant needs some care, in the form of doses of Greater Potions or pours of water.

  • To apply a dose of a Greater Potion, click once on the appropriate potion button if you're using 2D, or click once on the name of the appropriate potion at the bottom of the gump if you're using KR. If you have a keg or bottle containing the potion in your pack, it will be applied automatically. If not, you will have to target a keg or bottle containing the potion.

  • To add a pour of water, click once on the water pitcher button if you're using 2D, or click once on the water pitcher at the bottom of the gump if you're using KR. Then, target an actual water pitcher.
To tend your plant:

  • Infestation Level: yellow '+' add one dose Greater Poison; red '+' add two doses
  • Fungus Level: yellow '+' add one dose Greater Cure; red '+' add two doses
  • Poison Level: yellow '+' add one dose Greater Heal; red '+' add two doses
  • Disease Level: yellow '+' add one dose Greater Heal; red '+' add two doses
  • Water Level: yellow '-' add one pour of water; red '-' add two pours. If you see a yellow or red '+', the plant has been overwatered - don't add more water at this point
=======================================================
There will be a few special days in your plant's life from this point forward:

  • Day 7: your plant will “pop” out of its bowl. If you weren’t sure which type of plant you were growing, you will find out on day 7.

  • Day 7 & 8: If your plant was grown from a bog thing or bogling loot seed, and you have access to another of these plants that is at least 7 days old, you can use it to cross-pollinate your plant. You can also pollinate your plant using its own pollen.

  • Day 9: If your plant was not pollinated on Day 7 or 8, on Day 9 your plant will pollinate itself automatically.

  • Day 9+: You can set your plant to Deco Mode. It will stay beautiful forever, and will never need tending again!

  • Day 10 – Day 17: if your plant is healthy enough, it will produce one seed on each of these days (maximum of 8). If your plant is a resource producer, it will also produce one resource on each of these days (maximum of 8).

Congratulations! You’ve grown your first plant! May it be the first of many.
 

Hyssmaye

Seasoned Veteran
Stratics Veteran
Stratics Legend
1.2 Plant UIs ("Gumps") - 2D & KR Clients

Double-clicking a live plant will open its "gump", or plant UI. The plant gump provides information about your plant, and allows you to apply potions or water to your plant, cross-pollinate, gather seeds and resources, or set your plant to Deco Mode. The appearance of plant gumps differs slightly based on which UO client is used - 2D or KR (Kingdom Reborn). The two images below identify parts of the main plant gump in both clients:

Main Plant Gump - 2D Client


Main Plant Gump - KR Client


Main Plant Gump Functionality:
  • Days Growth Counter - displays the current stage of your plant's growth, from 1 to 9
  • To Reproduction Gump - click to display the Reproduction gump
  • Infestation/Fungus/Poison/Disease Indicators - yellow '+' means your have a moderate problem in one of these areas, a red '+' means there is a severe problem
  • Help (2D) - opens help popup window
  • Plant Health Status - vibrant, healthy, wilted or dying
  • Plant Image - in 2D shows a tuft of green leaves, the size of which depends on the age of your plant. At Day 7, will display the image of the plant's type. Behavior in KR is currently funky (8/2008)
  • Empty Plant Bowl - click to empty the plant bowl - if your plant is still in seed form, or is a sapling, you will get back a plant bowl and your seed. If your plant is any older than this you will destroy the plant
  • Growth Indicator - displays the result of the last growth check performed on the plant (see Section 1.3)
  • Water Button & Indicator (2D)/Water Level Indicator & Water Button (KR) - click the button to open a target cursor, then select a water pitcher to water the plant. The indicator displays the following symbols:
    • red '-': plant needs 2 pours of water
    • yellow '-': plant needs 1 pour of water
    • yellow '+': plant is moderately overwatered
    • red '+': plant is severely overwatered
  • Potion Buttons & Counters - display the number of potion doses that are currently applied to the plant (blank = none, 1, or 2)

The next two images identify the different parts of the Reproduction gump in both clients:

2D Reproduction Gump


KR Reproduction Gump


Reproduction Gump Functionality:
  • Back to Main View/Back - takes you back to the main plant gump
  • Pollen Indicator
    • displays "-" if no pollen has been produced
    • "!" if the plant can be pollinated or used to pollinate another plant
    • "+" if the plant has been pollinated
    • "X" if the plant will never produce pollen (is a mutant, rare color or bonsai)
  • Resource Indicator
    • displays "0/8" if the plant has not yet produced resources or if all resources have been removed from the plant
    • displays "(#)/8" to indicate the number of resources on the plant (1-8)
    • displays "X" if the plant will never produce resources (is a mutant, rare color, bonsai or non-resource plant)
  • Seed Indicator
    • displays "0/8" if the plant has not yet produced seeds or if all seeds have been removed from the plant
    • displays "(#)/8" to indicate the number of seeds on the plant (1-8)
    • displays "X" if the plant will never produce seeds (is a mutant, rare color or bonsai)
    • In 2D client, the color of the seed counter indicates the seed color. This does not currently work in the KR client.
  • Get Pollen Button/Link - click to get a target cursor to use in cross-pollination
  • Get Resources Button/Link - click to pull a resource off of the plant
  • Get Seeds Button/Link - click to pull a seed off of the plant
 

Hyssmaye

Seasoned Veteran
Stratics Veteran
Stratics Legend
1.3 All About Plant Growth

Plants grow in the UO world because of Growth Checks. Growth Checks are performed by your shard's server at certain times, depending on the location of your live plant.

  • Growth Checks will be performed when your character logs in:
    • If your plant is in your bank box
    • If your plant is in your backpack
    • If your plant is stored in a blue beetle that your character was riding when they last logged out
  • Growth Checks will be performed at your shard's Server Up (usually around 4-5am each morning):
    • If your plant is locked down in your house, but not inside a container

Note: plants that have been set to Deco Mode no longer have growth checks.

Plants won't grow in:
  • a secure container
  • a locked-down container

It will take about 24 hours after planting a seed for your plant to grow the first time. After this, if the plant is healthy, it will grow once per RL day if locked down in a house, or at log in in the situations explained above IF at least 24 hours have passed since the last time the plant grew.

The Growth Indicator on the plant's gump lets you know what occured at the plant's last growth check. If the Growth Indicator displays a:
  • Red "!" - plant did not grow because it was in a secure or locked-down container
  • Red "-" - plant did not grow because it was not Healthy or Vibrant. Plants with a health status of Wilted or Dying will not grow until their health improves through proper tending
  • Yellow "-" - plant did not grow because it has not been 24 hours since the last time it grew
  • Blue "+" - plant grew!
  • Green "+" - plant grew and got an extra day of growth because it was planted in Fertile Dirt
 

Hyssmaye

Seasoned Veteran
Stratics Veteran
Stratics Legend
1.4 Seed Types

There are now five types of of seeds:

  • Main Plant System Seeds


    • 1st generation seeds are found as loot on bog things and boglings and come in blue, red, yellow and plain colors
    • 2nd - 4th generation seeds can only be produced through cross-pollination. Through cross-pollination you can get seeds in bright red, orange, bright orange, bright yellow, green, bright green, bright blue, purple and bright purple
    • If you are lucky enough to get mutated seeds during cross-pollination, they will be black or white
    • These seeds grow into one of the 17 plant types belonging to the main plant system
    • Seeds found as loot or produced through cross-pollination are labelled with a color only, not a plant type
    • Seeds produced by allowing a plant to self-pollinate, or by pollinating a plant with its own pollen, will be labelled with a color AND plant type

  • Naturalist Quest Seeds ("Ant Quest" Seeds)

    • Obtained from a Naturalist after completing his quest
    • Come in pink, aqua and magenta
    • If you complete an extra, optional quest step, you'll get a fire colored seed
    • Labelled with a color only
    • Grow into one of the 17 plant types belonging to the main plant system
  • Bonsai Tree Seeds

    • Dropped as loot by Tokuno creatures only
    • Labelled as Common, Uncommon, Rare, Exceptional or Exotic
    • Common, Uncommon and Rare bonsai seeds will grow into a pink or green bonsai tree in a round or rectangular planter
    • Exceptional seeds grow into a peach-colored bonsai
    • Exotic seeds grow into a silver bonsai

  • Peculiar Seeds


  • Fragrant Seeds


Hyssmaye

Seasoned Veteran
Stratics Veteran
Stratics Legend
1.5 Plant Types, Colors & Cross-Pollination

There are 17 plant types in the main plant system, divided into four generations:


Seeds for the 1st Generation are found as loot on Bog Things and Boglings. Where do the other 14 types of plants come from? Cross-Pollination.

Cross-Pollination is the act of taking pollen from one plant and using it to pollinate a second plant. Both the type and color of the seeds produced by a pollinated plant are determined by the type and color of the "father" plant (pollen donor) and the "mother" plant (pollen recipient).

Note that there is no actual item "Pollen" in the game. When you click the pollen button on a ("father") plant's Reproduction gump, your cursor changes to a target cursor. Select an unpollinated ("mother") plant - and that's it! You've just cross-pollinated a UO plant.

The "mother" plant will start to produce seeds on Day 10 of it's growth, and if it is healthy, will continue to produce 1 seed each day for 8 days (produces 8 seeds total). The color of the seed counter on the mother plant's Reproduction gump will match the color of the seeds that the mother plant will produce (currently works in 2D but not in KR). Seeds produced by cross-pollinating two plants will be labelled with a color name, but not a plant type.

Plants can only be cross-pollinated on Days 7 & 8 of their growth. On Day 9, if the plant has not been cross-pollinated, it will self-pollinate. It is also possible to pollinate a plant with its own pollen on Days 7 & 8 of its growth - in this case, as with self-pollination, the resulting seeds will be labelled with both a plant type and color name.

"Father" plants can be kept indefinitely as pollen donors if they are kept in a secure container inside a house to freeze their growth. Take them out to use when cross-pollinating, then put them back in the secure.

Use the following information to determine which plants to cross in order to get seeds of any plant type:

Campion
  • Campion x Campion
  • Campion x Poppies (50% chance)

Poppies
  • Poppies x Poppies
  • Snowdrops x Campion
  • Bulrushes x Campion
  • Poppies x Campion (50% chance)
  • Poppies x Snowdrops (50% chance)

Snowdrops
  • Snowdrops x Snowdrops
  • Bulrushes x Poppies
  • Lilies x Campion
  • Lilies x Poppies
  • Pampas Grass x Campion
  • Snowdrops x Poppies (50% chance)
  • Snowdrops x Bulrushes (50% chance)

Bulrushes
  • Bulrushes x Bulrushes
  • Lilies x Snowdrops
  • Pampas Grass x Poppies
  • Pampas Grass x Snowdrops
  • Rushes x Campion
  • Rushes x Poppies
  • Elephant Ear x Campion
  • Bulrushes x Snowdrops (50% chance)
  • Bulrushes x Lilies (50% chance)

Lilies
  • Lilies x Lilies
  • Pampas Grass x Bulrushes
  • Rushes x Snowdrops
  • Rushes x Bulrushes
  • Elephant Ear x Poppies
  • Elephant Ear x Snowdrops
  • Fern x Campion
  • Fern x Poppies
  • Ponytail Palm x Campion
  • Lilies x Bulrushes (50% chance)
  • Lilies x Pampas Grass (50% chance)

Pampas Grass
  • Pampas Grass x Pampas Grass
  • Rushes x Lilies
  • Elephant Ear x Bulrushes
  • Elephant Ear x Lilies
  • Fern x Snowdrops
  • Fern x Bulrushes
  • Ponytail Palm x Poppies
  • Ponytail Palm x Snowdrops
  • Small Palm x Campion
  • Small Palm x Poppies
  • Century Plant x Campion
  • Pampas Grass x Lilies (50% chance)
  • Pampas Grass x Rushes (50% chance)

Rushes
  • Rushes x Rushes
  • Elephant Ear x Pampas Grass
  • Fern x Lilies
  • Fern x Pampas Grass
  • Ponytail Palm x Bulrushes
  • Ponytail Palm x Lilies
  • Small Palm x Snowdrops
  • Small Palm x Bulrushes
  • Century Plant x Poppies
  • Century Plant x Snowdrops
  • Water Plant x Campion
  • Water Plant x Poppies
  • Snake Plant x Campion
  • Rushes x Pampas Grass (50% chance)
  • Rushes x Elephant Ear (50% chance)

Elephant Ear
  • Elephant Ear x Elephant Ear
  • Fern x Rushes
  • Ponytail Palm x Pampas Grass
  • Ponytail Palm x Rushes
  • Small Palm x Lilies
  • Small Palm x Rushes
  • Century Plant x Bulrushes
  • Century Plant x Lilies
  • Water Plant x Snowdrops
  • Water Plant x Bulrushes
  • Snake Plant x Poppies
  • Snake Plant x Snowdrops
  • Prickly Pear Cactus x Campion
  • Prickly Pear Cactus x Poppies
  • Barrel Cactus x Campion
  • Elephant Ear x Rushes (50% chance)
  • Elephant Ear x Fern (50% chance)

Fern
  • Fern x Fern
  • Ponytail Palm x Elephant Ear
  • Small Palm x Rushes
  • Small Palm x Elephant Ear
  • Century Plant x Pampas Grass
  • Century Plant x Rushes
  • Water Plant x Lilies
  • Water Plant x Pampas Grass
  • Snake Plant x Bulrushes
  • Snake Plant x Lilies
  • Prickly Pear Cactus x Snowdrops
  • Prickly Pear Cactus x Bulrushes
  • Barrel Cactus x Poppies
  • Barrel Cactus x Snowdrops
  • Tribarrel Cactus x Campion
  • Tribarrel Cactus x Poppies
  • Fern x Elephant Ear (50% chance)
  • Fern x Ponytail Palm (50% chance)

Ponytail Palm
  • Ponytail Palm x Ponytail Palm
  • Small Palm x Fern
  • Century Plant x Elephant Ear
  • Century Plant x Fern
  • Water Plant x Rushes
  • Water Plant x Elephant Ear
  • Snake Plant x Pampas Grass
  • Snake Plant x Rushes
  • Prickly Pear Cactus x Lilies
  • Prickly Pear Cactus x Pampas Grass
  • Barrel Cactus x Bulrushes
  • Barrel Cactus x Lilies
  • Tribarrel Cactus x Snowdrops
  • Tribarrel Cactus x Bulrushes
  • Ponytail Palm x Fern (50% chance)
  • Ponytail Palm x Small Palm (50% chance)

Small Palm
  • Small Palm x Small Palm
  • Century Plant x Ponytail Palm
  • Water Plant x Ponytail Palm
  • Snake Plant x Elephant Ear
  • Snake Plant x Fern
  • Prickly Pear Cactus x Rushes
  • Prickly Pear Cactus x Elephant Ear
  • Barrel Cactus x Pampas Grass
  • Barrel Cactus x Rushes
  • Tribarrel Cactus x Lilies
  • Tribarrel Cactus x Pampas Grass
  • Small Palm x Ponytail Palm (50% chance)
  • Small Palm x Century Plant (50% chance)

Century Plant
  • Century Plant x Century Plant
  • Water Plant x Small Palm
  • Snake Plant x Ponytail Palm
  • Snake Plant x Small Palm
  • Prickly Pear Cactus x Ponytail Palm
  • Barrel Cactus x Elephant Ear
  • Barrel Cactus x Fern
  • Tribarrel Cactus x Rushes
  • Tribarrel Cactus x Elephant Ear
  • Century Plant x Small Palm (50% chance)
  • Century Plant x Water Plant (50% chance)

Water Plant
  • Water Plant x Water Plant
  • Snake Plant x Century Plant
  • Prickly Pear Cactus x Small Palm
  • Prickly Pear Cactus x Century Plant
  • Barrel Cactus x Ponytail Palm
  • Barrel Cactus x Small Palm
  • Tribarrel Cactus x Fern
  • Tribarrel Cactus x Ponytail Palm
  • Water Plant x Century Plant (50% chance)
  • Water Plant x Snake Plant (50% chance)

Snake Plant
  • Snake Plant x Snake Plant
  • Prickly Pear Cactus x Water Plant
  • Barrel Cactus x Century Plant
  • Barrel Cactus x Water Plant
  • Tribarrel Cactus x Small Palm
  • Tribarrel Cactus x Century Plant
  • Snake Plant x Water Plant (50% chance)
  • Snake Plant x Prickly Pear Cactus (50% chance)

Prickly Pear Cactus
  • Prickly Pear Cactus x Prickly Pear Cactus
  • Water Plant x Tribarrel Cactus
  • Snake Plant x Barrel Cactus
  • Tribarrel Cactus x Snake Plant
  • Prickly Pear Cactus x Snake Plant (50% chance)
  • Prickly Pear Cactus x Barrel Cactus (50% chance)

Barrel Cactus
  • Barrel Cactus x Barrel Cactus
  • Tribarrel Cactus x Prickly Pear Cactus
  • Barrel Cactus x Prickly Pear Cactus (50% chance)
  • Barrel Cactus x Tribarrel Cactus (50% chance)

Tribarrel Cactus
  • Tribarrel Cactus x Tribarrel Cactus
  • Tribarrel Cactus x Barrel Cactus (50% chance)


Stratics Color-Crossing Chart

Use this chart to figure out which colors of plants to cross-pollinate in order to create seeds in any of the 12 main colors or plain-color:


Hyssmaye

Seasoned Veteran
Stratics Veteran
Stratics Legend
1.6 Mutant Plants

When you cross-pollinate two different plants, there is a small chance (~1%) that a mutation will occur, and the 8 seeds produced will be either bright white or black. If you are using the 2D client, you can tell immediately whether or not you've gotten a mutation, by looking at the color of the "0/8" seed counter on your plant's Reproduction gump. There is a bug in the KR Reproduction gump as of August 2008 - the seed counter is always "plain" colored - so the only way to tell if you got a mutation is to pull a seed off the plant and look at its color.

Mutant plants cannot be used in cross-pollination, and do not produce seeds or resources, so set them to 'Deco Mode' on day 9.

Depending on the plant type, mutant plants can be worth a nice bit of gold, although white plants generally command a much higher price than black plants. As of August 2008, I sell mutants on Chesapeake - 25k for white plants, 5k for black. They sell pretty well, depending on the plant type.

The only confirmed way to increase your chance of getting mutants is to cross-pollinate as many plants as you can! Eventually you will get some. There is, however, quite a bit of superstition related to mutants - some gardeners keep "lucky father" plants in a secured container and use these for cross-pollinating in hopes of producing more mutants. A "lucky father" plant is the pollen-donor in a cross-pollination that resulted in mutant seeds. Additionally, some gardeners prize "lucky fathers" that are Healthy or Vibrant but have red or yellow '+' signs for infestation and/or fungus. The "lucky father" approach is, as I have stated, mere superstition and has never been confirmed by developers or scientifically proven to be effective. This hasn't stopped me from keeping my own secure full of "lucky fathers", and using these when cross-pollinating. Do I get more mutants this way? I have no idea, but I *feel* luckier when I use them :)
 

Hyssmaye

Seasoned Veteran
Stratics Veteran
Stratics Legend
1.7 Fertile Dirt

  • Plants grown in Fertile Dirt have a small chance to get an extra day's worth of growth each time their growth check is made

  • To fill a plant bowl with Fertile Dirt, double-click the plant bowl, then target a stack of 20 Fertile Dirt. Yes, it takes 20 Fertile Dirt to fill ONE plant bowl - this stuff is precious, so save it for special occasions!

  • Fertile Dirt can be found as loot on UO creatures, or spawned along with reagents by planting a green thorn in a dirt patch or dirt road

    • When a green thorn is planted, random stacks of magery reagents and Fertile Dirt spawn. If you're lucky enough to get some Fertile Dirt stacks, they will each contain 11-21 pieces

    • The following creatures carry Fertile Dirt as loot:
 

Hyssmaye

Seasoned Veteran
Stratics Veteran
Stratics Legend
1.8 Resources

Some plants are able to produce Resources that have special properties in addition to seeds. A Resource-producing plant, if healthy, will produce 1 Resource per day up to a maximum of 8 Resources. Resources can be removed from the plant by clicking the 'Get Resources' button or link on the plant's Reproduction gump.

The types of Resources are:


Hyssmaye

Seasoned Veteran
Stratics Veteran
Stratics Legend
1.9 Vines

Planting a Green Thorn in swampy terrain causes a Whipping Vine to spawn. A safe place to do this is in the swampy areas around Papua. If you kill the Whipping Vine, you will find decorative vines on its corpse. These vines can be locked down in houses and used as decoration.

There are three varieties of vines. Each variety has a south-facing form and an east-facing form (2D & KR images):

Vine A


Vine B


Vine C


Some players lock other items down on tiles around their locked down vines, and raise the items so that they appear to be part of the vine. Popular examples are grapes, nightshade, melons and dyed balls of yarn.
 

Hyssmaye

Seasoned Veteran
Stratics Veteran
Stratics Legend
1.10 Bonsai Seeds & Trees by kittykat

Q. Where do bonsai plants come from?
A. Bonsai plants are grown from bonsai seeds which are available off a variety of monsters in the Tokuno Islands of the Samarai Empire expansion

Q. Do I have to upgrade to SE to grow bonsai seeds?
A. No you do not, however you do have to upgrade to go to the new islands to get the bonsai seeds. Otherwise you will need to buy seeds from vendors or have friends get them for you.

Q. Which is the best monster to get seeds from and where should I go for them?
A. General consensus is that Deathwatch Beetles are the easiest way to get bonsai seeds. These monsters are located in the desert north of Zento (on Makoto-Jima) named "The Waste". The Waste is home to Deathwatch Beetles, Deathwatch Beetle Hatchlings, orcs, and undead creatures. The orc camps are small and the undead creatures are in the western half of The Waste (and can be avoided if needed). Hatchlings do not carry seeds ever. Deathwatch Beetles carry seeds roughly 1/3 to 1/2 the time. All 5 seed types are available from the Beetles although Exceptional and Exotic are much harder to get.

It has also been theorized that different monsters on the islands have a tendancy to carry different seeds more often (or exclusively) to other types. For example, Rune Beetles seem to exclusively carry exotic seeds.

Q. So what are the seed types and how many different plants are there?
A. There are five seed types that we believe are in this order of rarity:
  • Common
  • Uncommon
  • Rare
  • Exceptional
  • Exotic

There are 8 different bonsai plant graphics and research has shown that they split up as follows, 2 are Common (1 green and 1 pink plant), 2 are Uncommon (1 green and 1 pink plant), 2 are Rare (1 green and one pink plant), 1 is Exceptional (a peach plant), and 1 is Exotic (a white plant), as can be seen in the following pictures (KR & 2D):

Common Bonsai


Uncommon Bonsai


Rare Bonsai


Exceptional Bonsai


Exotic Bonsai


Q. Is there any difference in growing bonsai than any normal plant?
A. No, no difference at all. Bonsai plants have a 9 day growth cycle and pop on day 7 exactly as any normal plant. At day 9 they can be set to decorative mode. When you set your plant to decorative mode, it will be labelled with it's bonsai type (for example, "A Decorative Rare Bonsai Tree").

Q. Can bonsai be cross-pollinated or do they produce any resources?
A. No, bonsai behave in the exact same manner as mutant and rare plants do. You can not collect pollen, resources, or seeds from them.

Q. Do bonsai trees block character movement?
A. Yes, they do both as live plants (day 7 or later) and as decorative plants, they will block movement.

A special thanks to Armageddon for providing the 2D bonsai pictures.
 

Hyssmaye

Seasoned Veteran
Stratics Veteran
Stratics Legend
1.11 Naturalist Quest (aka "Ant Quest") Seeds & Plants by Ambrossia


The Naturalist Quest, also known as The Seed Quest or Ant Quest, is a short quest to obtain a rare Pink, Magenta, Aqua, or Fire Red plant seed. These seeds are not available any other way in the game aside from buying them off of a player run vendor who has done the quest.

General Summary of The Naturalist Quest

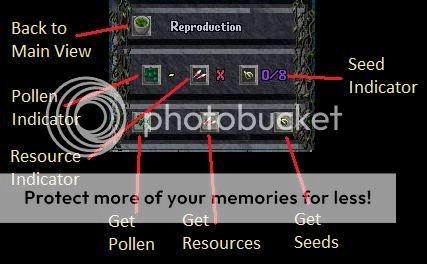
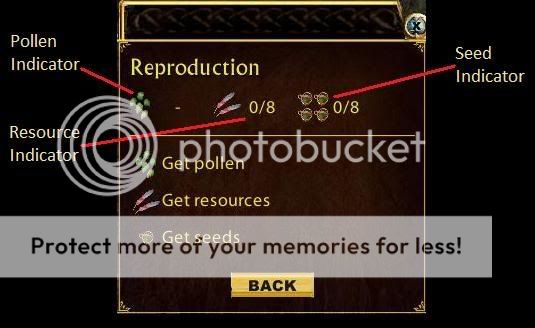
You start by talking to any Naturalist NPC in the game. He will send you out into the world to find four (4) Solen Egg Nests located within the Solen Hives. He wants you to study them for a while, record your findings, and report back to him when you are done. As a reward, he will give you one of three rare seeds: Pink, Magenta, or Aqua. The color seed you receive is completely random and you will not know what plant the seed will grow up to be until you actually plant it and it reaches day 7 of growth.

In order to receive the rare Fire Red seed, you must complete an extra part of the quest that does not appear on the quest menu. That is, you plant a green thorn into a sandy place and a hole will appear, leading to the secret 5th Solen egg nest.


Getting Started and Preparing Yourself

The Naturalist quest is extremely easy if you are well prepared.

First, you will want to be a friend of the hive so that the ants don’t attack you. It’s not necessary, but it helps tremendously! Sure you can just kill them. But why waste time when you can be getting rare seeds! The quest to become a friend of the hive is called “The Solen Matriarch Quest”. If you’re not a friend of the hive, you should really consider becoming one!

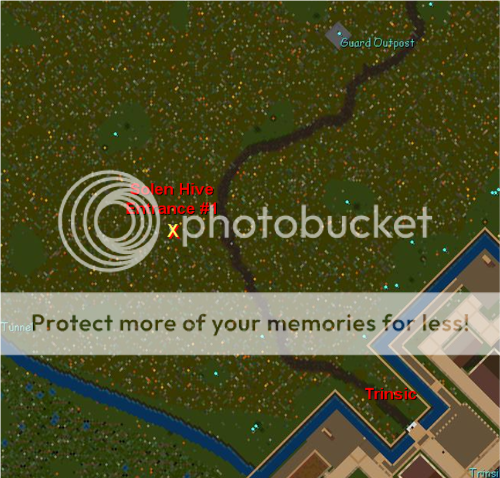
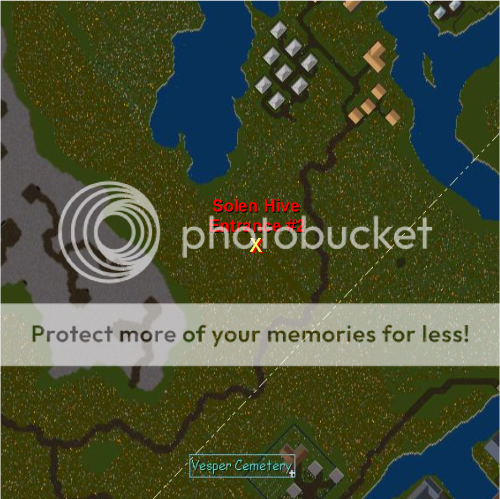
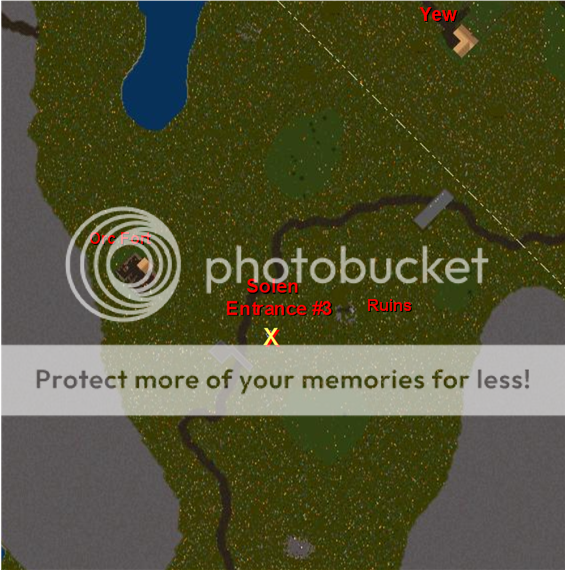
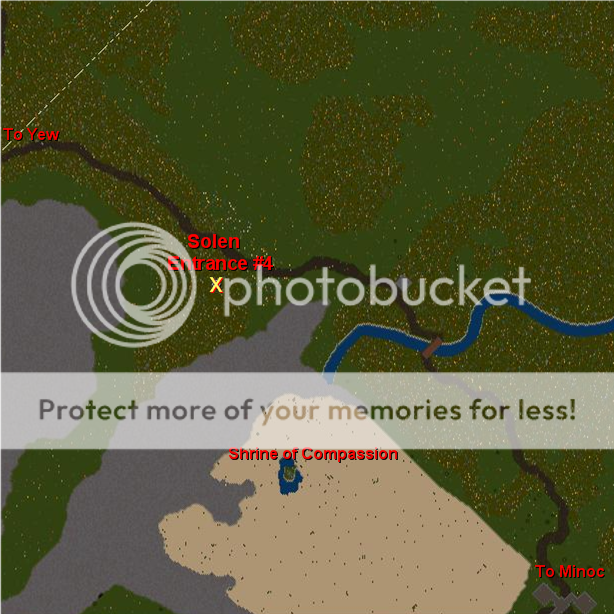
Secondly, you will need to know where the entrances to the Solen hives are. There are 4 total throughout the world. While I've labeled them 1 through 4, there are no actual numbered Solen Hives. Other players may refer to them differently from mine. I used my own numbering system to simply help you get around. They are:


West of Trinsic in the Forest


South of the Minoc Gypsy Camp


Far South of Yew Near the Grove of Love


In the Forest Northwest of the Compassion Desert


It is a good idea to have a runebook with these 4 locations marked. Make sure you mark one for the Naturalist and for a beach or desert as well.

Try to become familliar with the layout of the Solen Hive. It's good to know where all the holes lead, where the Egg Nests are actually located, and most importantly, areas to avoid.


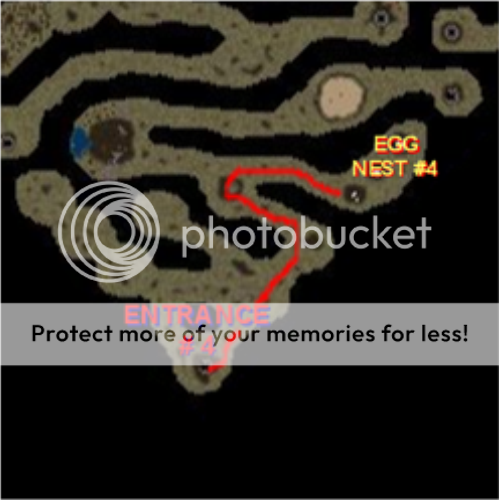
Here is a Gereral Layout of the Solen Lair, the Four Entrances, and the Location of the Egg Nests:


Walkthrough

To start the quest, you need to find an NPC Naturalist. They can be found inside almost any library in Britannia. All Naturalists look pretty much the same. They’re dressed in Nox Green colored tunics and are ussually in the company of NPC Scribes and/or Monks.
Here is a list of what cities to find them:

Britain: The Britain Public Library, Sage Advice (scroll shop in SE Britain), and the First Library of Britain.
Jhelom: Jhelom Library.
Moonglow: The Lycaeum.

It doesn’t matter which Naturalist you go to. They all give the same quest and have the same reward.
When you’ve found him, single click on him and select “Talk” to bring up the quest menu. He’ll tell you that he needs you to gather information about the 4 Solen Egg Nests located within the Solen Hive. Click “Accept” and your quest has begun!

Walkthrough tip # 1: Remember exactly which Naturalist gives you the quest, including his name and what city he’s in. Once you’ve completed the quest , you MUST talk to the same Naturalist to get your reward. And remember that you cannot begin another Naturalist Quest until you complete your current one.
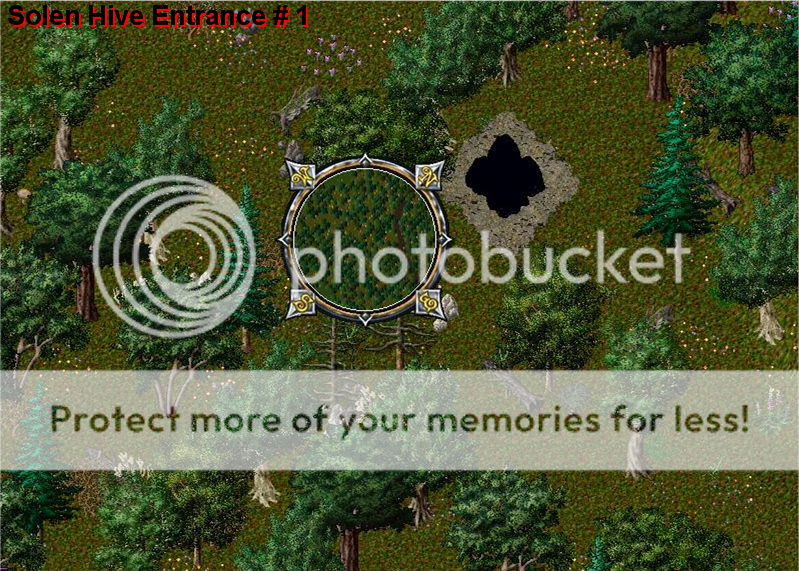

Solen Hive # 1


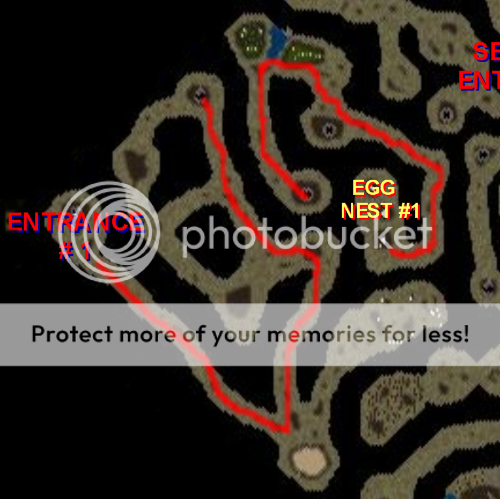
Recall to the Solen Hive Entrance #1 which I’ve labeled as the one near Trinsic. Enter it and get yourself to the first Solen Egg Nest. This is by far the longest stretch to travel out of the four Solen Entrances. The Solen Hive can be a little confusing to someone who is not familiar with it, so just follow the path I marked on the map below to get there.


Walkthrough tip # 2: You’ll most likely run into an Ant Lion near the sand pit. Don’t bother fighting it because you can easilly out run it. Also, be carefull that you don’t take the wrong path north past the sand pit. It leads to the Dread Spider lair!

Once you get to the egg nest, walk up to it and you’ll get the message: “You begin studying the Solen Egg Nest to gather information”.
After studying the Solen Egg Nest for 15 seconds you’ll get the message: “You begin recording your completed notes on a bit of parchment”.
When you are done, it will give you the message: “You have completed your study of this Solen Egg Nest. You put your notes away”.

It takes a total of 30 seconds from the time you reach the Egg Nest to when you have all of the information that you need to move on. You don’t need to bring anything or do anything except be at the Solen Egg Nest area for 30 seconds. If you are attacking any Ants (or any Ants are attacking you), you may lose your concentration and have to study this nest all over again. That’s why it’s good to be a friend of the Hive. Also, the piece of parchment that you record your information on is just imaginary. I know it goes without saying, but some people actually think that you need a piece of parchment or a scroll to do the quest.

Once you put your notes away, travel to the next Solen entrance.

Solen Hive # 2


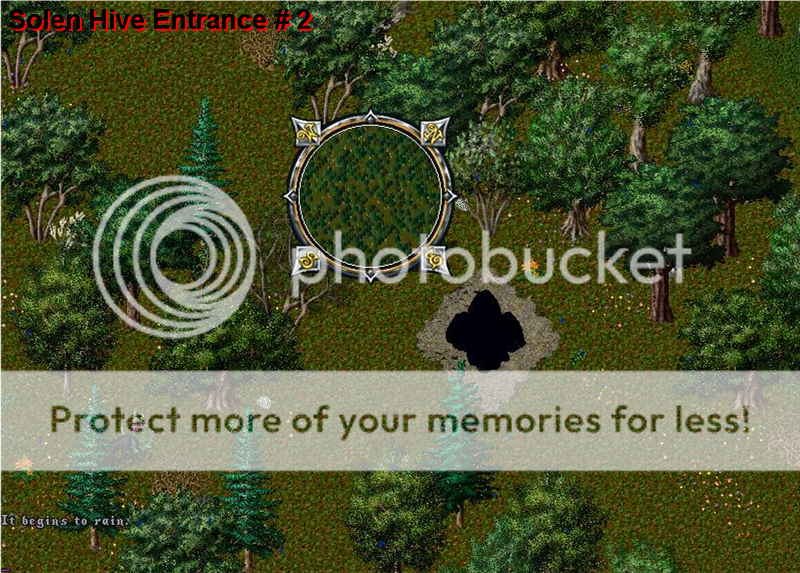
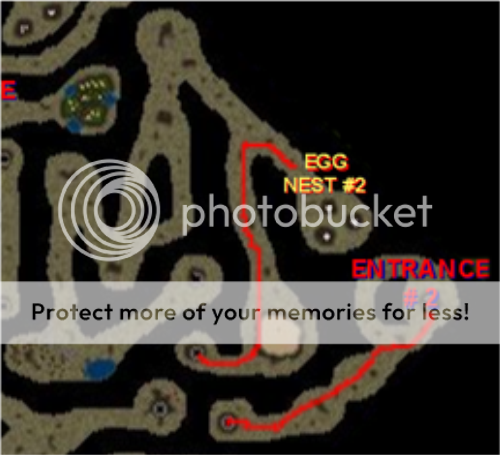
Recall to the Solen Hive Entrance #2 which I’ve labeled as the one South of the Minoc Gypsy camp. Enter it and get yourself to the second Solen Egg Nest. Use the map below to help guide you to it. It’s fairly straight forward and easy to find. When you’re done, move onto the 3rd Solen Hive entrance.


Walkthrough tip # 3: You’ll most likely run into another Ant Lion near the sand pit. Just ignore it and run.

Solen Hive # 3


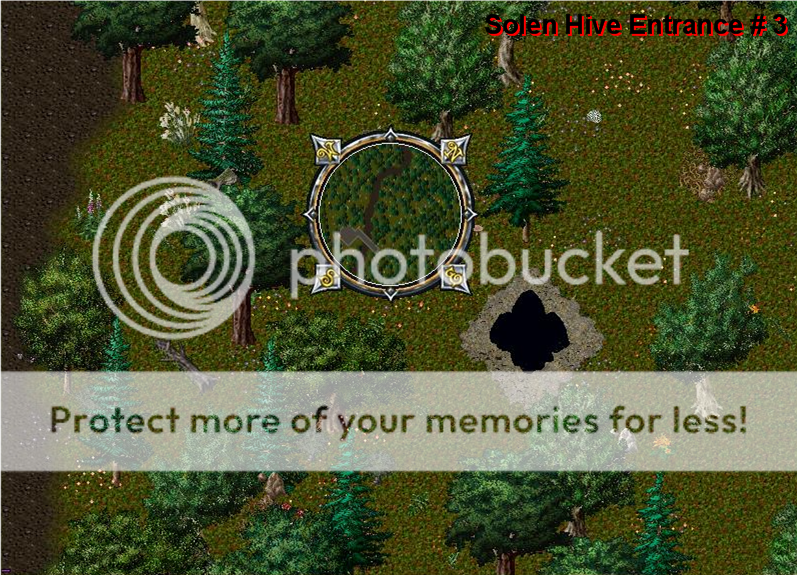
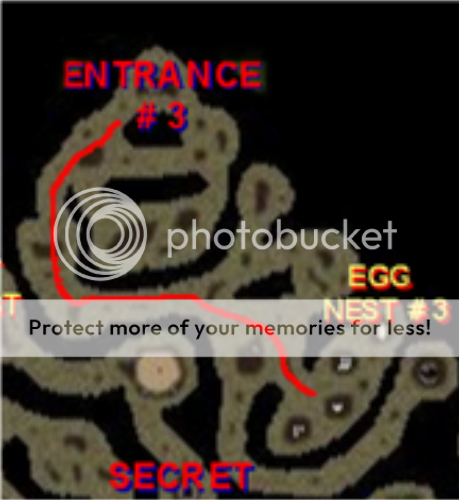
Recall to the Solen Hive Entrance #3 which I’ve labeled as the one far South of Yew and near the grove of love. Enter it and get yourself to the third Solen Egg Nest. When you’re done, move onto the 4th Solen Hive entrance.


Walkthrough tip # 4: Every once and a while, a Lich from the ruins makes its way South and hovers around the 3rd Solen Hive entrance. If you plan on doing this quest again when you’ve completed your current one, make sure you kill i.t That way, when you Recall or Sacred Journey back here it won’t be a problem. Always keep your eyes open when traveling to any of the Solen Hive entrances!
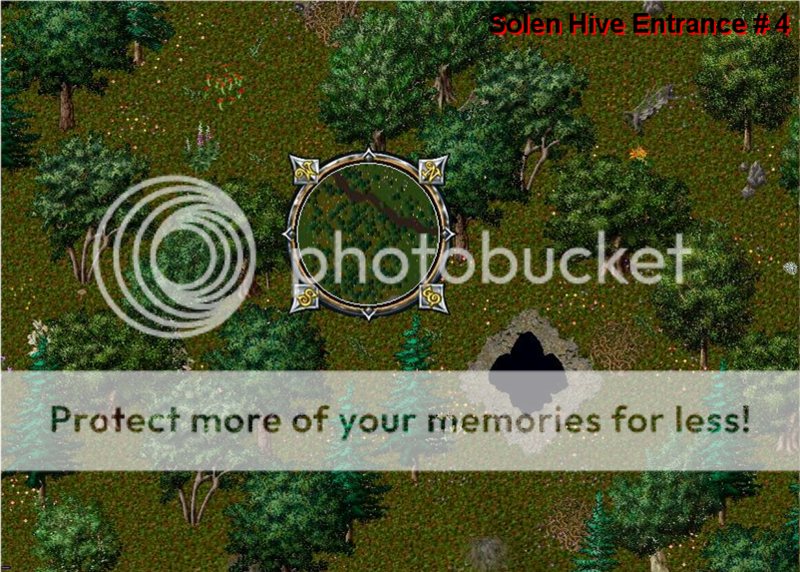
Solen Hive # 4


Recall to the Solen Hive Entrance #4 which I’ve labeled as the one in the forest northwest of the Compassion desert. Enter it and get yourself to the fourth and last Solen Egg Nest. When you’re done, you’ll get the message that the quest is complete.


At this point, you have two options:
The first option is that you return back to the Naturalist to claim a rare Pink, Magenta, or Aqua colored seed as your reward.
The second option is to find the secret 5th Solen Egg Nest so that you can return back to the Naturalist to claim a rare Fire Red colored seed. This option is not listed on the quest menu. It is completely optional.

Walkthrough tip # 5: Remember that you can do the Naturalist Quest over and over as many times as you’d like. So if you want to get a Fire Red seed this time and next time get a Pink, Magenta, or Aqua seed , you can do so.


Solen Hive # 5 (Secret Solen Hive)

Make sure you bring a green thorn with you. Without one, you cannot get to the secret Solen Egg Nest entrance. Take yourself to any beach or sandy terrain and plant the thorn in the sand. After about 10 seconds, a new hole will open up. Hop in and take yourself to the 5th Solen Egg Nest. When you’re done, return to the Naturalist to claim your rare Fire Red seed.


How Long Does The Naturalist Quest Take To Do?

When you become very familiar with the Hive and proficient in doing the quest, it can take you as little as 5 minutes to complete the normal portion of this quest and about 6 minutes to complete the quest with the optional secret egg nest. For the beginner, it can take around 10 minutes or more to do the normal quest.

You can actually cut your quest time down even further! As you do the quest, you’ll notice that there are plenty of other holes within the Solen Hive. All of these holes connect the Solen Hive to other different locations within the hive. Sometimes, from one of the Egg Nests you are at, it is quicker to take one of these holes to the next Egg Nest rather than Recalling or using Sacred Journey to get to the next entrance. For example, from the Solen Egg Nest #3, you can follow a path to the south and through a couple holes to reach Solen Egg Nest #1. This is actually quicker than traveling to the Solen Entrance #1, following the path, and reaching the Solen Egg Nest #1.


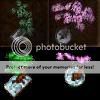
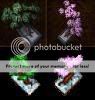
Everything You Need To Know About The Pink, Magenta, Aqua, and Fire Red Seed

After you’ve completed what the Naturalist asked you to do, he will give you a rare Pink, Magenta, or Aqua colored seed. If you went above and beyond his expectations and found the secret 5th Solen Egg Nest, he will give you a rare Fire Red colored seed.

The Pink, Magenta, or Aqua color seed he gives you is completely random. You may do the quest 10 times and end up with 10 Magenta seeds, or you may do the quest 10 times and end up with several of each different color. If you found the 5 Egg Nests, you will always get a Fire Red seed no matter what.

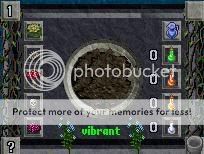
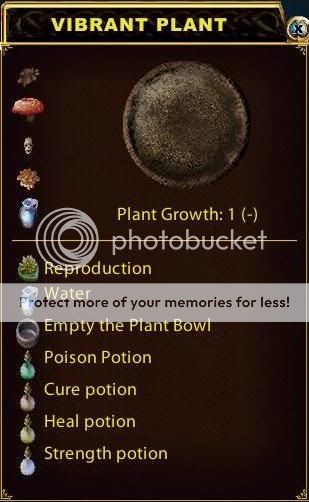
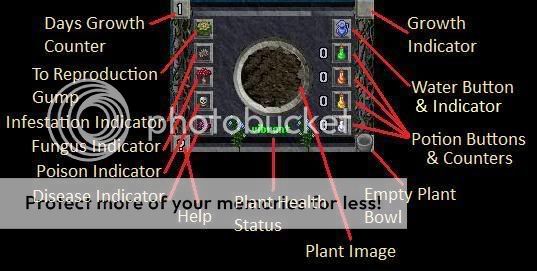
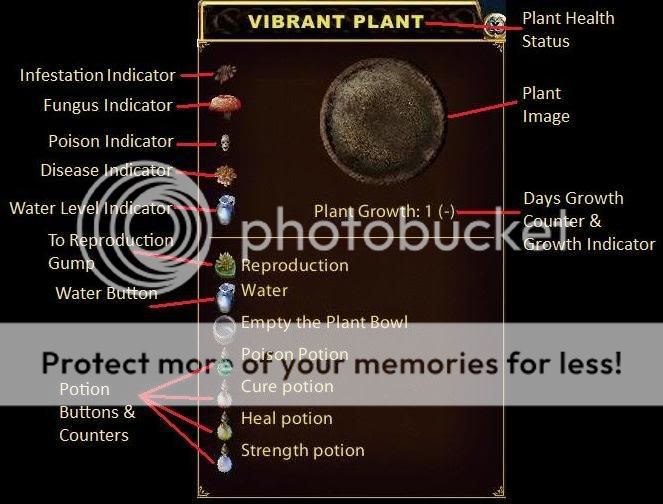
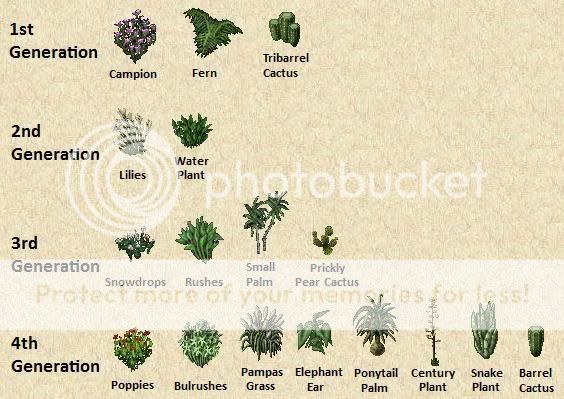
Unlike other seeds that you take off of your plants, there is no way of knowing what type of plant or flower the seed will grow up to be. The seed itself is already internally coded to be a certain plant. The server knows what type of plant the seed will grow up to be, but you won’t. You won’t know until you plant it and it reaches day 7 of growth. Then the plant blooms and breaks out of its bowl. There are, however, some hints as to what the plant might be as it is growing. If it needs a lot of cure and poison potions every growth cycle, it is usually (but not always) a flowering type of plant such as Campion flowers, Poppies, Snowdrops, Lilies, Bulrushes, etc. If you find that on certain days of the plants growth cycle it does not need water, then you have a Snake Plant, a Water Plant, or a Cactus.

Edited by Hyssmaye
 

Hyssmaye

Seasoned Veteran
Stratics Veteran
Stratics Legend
1.12 Magic Waves & Water Pitchers

Water pitchers, which gardeners use to water plants, normally hold only 5 pours of water. This makes watering plants quite a chore, as you must refill your water pitcher frequently. Fortunately there is a solution to this problem! Magic Waves.

Magic Waves are stationary wave images found on water tiles. They look like this:

Magic Wave in 2D Client


Magic Wave in KR Client


Every time you fill your water pitcher from a Magic Wave (double-click pitcher, select Magic Wave), your pitcher will have an additional 5 pours of water added to it. Fill your pitcher over and over without emptying it, and the number of available pours in the pitcher add up very quickly! Fill your pitcher 20 times in a row, and you'll be able to pour water 100 times from the pitcher before it is empty.

Magic Waves can be found in many places - here is one location:

  • City of Vesper, just south of The Busy Bees next to the bridge
 

Hyssmaye

Seasoned Veteran
Stratics Veteran
Stratics Legend
1.13 Saving a Wilted or Dying Plant

It happens to the most attentive gardeners. Your plant is growing wonderfully, and then for some reason you miss tending it for a day, or maybe two. Or three. The next thing you know, its health has slipped to the Wilted, or even Dying stage!

Take heart - it is possible to heal a plant in this state.

Apply TWO doses each of Greater Heal potion and Greater Strength potion, and any needed water, Greater Poison or Greater Cure potions.

Check your plant each day after its growth check, to see if its health has improved. It may take multiple days of applying potions in the above manner to see any improvement in its health, but it IS possible to save plants that are very sick.
 

Hyssmaye

Seasoned Veteran
Stratics Veteran
Stratics Legend
1.14 Tips & Tricks

1.14.1 Store Seeds on Plants - don't pull seeds off of plants until you need them. Keep live plants with the seeds still on them inside a secure container - this freezes their growth - the plants won't need tending and you can keep the seeds as long as you want. This will save you a lot of storage space, and can help you keep track of which plant type unlabelled seeds may produce.

1.14.2 Always Cross-Pollinate Like to Like for More Mutant Chances - If you'd like more chances to get mutant seeds, ALWAYS cross pollinate! Keep spare live plants in a secure in your house to use to pollinate another plant of the same type and color (the exception for color is when plain seeds are desired - any color plant * a plain plant will result in plain seeds. Or, if you're raising more than one of the same type and color of plant, cross them with each other on Day 7 or 8.

1.14.3 Hints to Resulting Plant Type When Starting with an Unlabelled Seed - Even if you started with an unlabelled seed, there are some hints as to what the plant might be as it is growing. If it needs a lot of cure and poison potions every growth cycle, it is usually (but not always) a flowering type of plant such as Campion flowers, Poppies, Snowdrops, Lilies, Bulrushes, etc. If you find that on certain days of the plants growth cycle it does not need water, then you have a Snake Plant, a Water Plant, or a Cactus. by Ambrossia

1.14.4 Fill Your Water Pitcher from a Magic Wave - see Section 1.12 above

1.14.5 Two Ways to Freeze Plant Growth - Freeze a plant's growth by tossing it in a secure container in your house. This is very handy if you'll be unable to tend your plants for a while, but don't want them to die. If you choose, you can also dedicate a character to gardening, and grow plants in their backpack and/or bank box - the plants will NOT get Growth Checks until you log your gardening character in again! This can be very handy if you want to grow plants, but know that you won't be able to tend them on consecutive days.

1.14.6 Fast Watering Method - If you mouse-over a plant bowl with a plant in it younger than Day 7, the description will start with the moisture level of the dirt in the bowl. Example: "A Bowl of Hard Dirt With A Vibrant Plain Sapling". If the dirt description is "hard", you can double-click your water pitcher and select the bowl, and water the plant without having to open the plant gump. For "hard" dirt, you'll have to apply two pours of water to get the dirt to "soft" state. by kittykat

1.14.7 Set Rare Plants, Mutants and Bonsai Trees to Deco Mode on Day 9 - These three plant types don't produce seeds or resources, so there isn't any point in keeping them in a Live state after Day 9 of their growth. Set them to Deco Mode, and they will stay beautiful forever!

1.14.8 Stack Plant Gumps When Tending Multiple Plants - If you double-click on several plants one after the other, their plant gumps will stack. This works well in 2D, but not as well in KR since KR plant gumps are translucent, and you can see the red or yellow '+' and '-' signs of the gump below the one you're working with.

1.14.9 Cross-Pollinating & Color:
  • Color [y] * Color [y] = Bright Color [y]
  • Color [y] * Bright Color [y] = Bright Color [y]
  • Plain * Any Color = Plain
1.14.10 Stock Plain Plants in Bulk on Plant Vendors - Plain plants generally sell better than colored plants, due to the existing "single hue" plant issue in the 2D client, and the fact that only some plants are partially hued in the KR client. People often find partially hued plants more attractive than, for example, a solid bright blue plant. I sell plain plants consistently for 2k each on Chesapeake. If you have a plant vendor or shop and want to boost your profits, I recommend stocking lots of plain plants, especially:

  • Campions
  • Poppies
  • Snowdrops
  • Lilies
  • Pampas Grass
  • Ferns
  • Rushes
  • Water Plants
1.14.11 Other Plant Selling Tips
  • Stock decorative vines, but don't price them too cheaply! I sell them on Chesapeake for at least 3500 gold.

  • Stock Orange Petals in stacks, and include a description of what they're good for on the container they're in.

  • Think carefully before stocking every type of single-hued plant - they don't move as quickly as plain plants, and can eat up the profits you make from selling other gardening items. It may be a good idea to stock more popular plant types in bright colors, and put up a bulletin board in your shop stating that other plants are available upon request.

  • Advertise - drop some runes to your shop around and mention the fact that you stock plain plants in BULK (if you do).

1.14.12 Make an Alchemist, or Befriend One: The potions used in Gardening are all Greater potions, and so can't be purchased from NPC Vendors. It helps a lot to have your own alchemist, or to be friendly with one who is willing to either make potions for you or sell them to you at a good price.

1.14.13 If You're Planning to Set a Plant to Deco Mode on Day 9, Don't Tend it on Day 8 if it's Vibrant - This works as long as your plant's health status is "Vibrant". Yes, on Day 9 its health may have slipped down to "Healthy", but if you're going to set the plant to Deco Mode on Day 9 anyway, don't waste any potions on it on Day 8. by kittykat

1.14.14 Get a Giant Beetle for your Gardener: In RL, Gardeners generally don't care for beetles of any kind. But in UO, the blue Giant Beetle is the Gardener's friend! If you normally keep your growing plants in your backpack or bank box, get your gardening character a beetle to ride, and you'll have another 125 slots to grow plants in. Growth Checks will be performed at Log In on all live plants older than 24 hours that are inside the beetle your character is riding, just as they are performed on the plants in your bank box and backpack.

1.14.15 If you're gathering fertile dirt, take empty bowls with you and fill them as you get the dirt: Drastically reduces your weight allowing you to stay out gathering for a much longer time. by Beastmaster
 

Hyssmaye

Seasoned Veteran
Stratics Veteran
Stratics Legend
1.15 Xena Dragon's Guide to Gardening in Small Spaces by Xena Dragon

The point of the post you are about to read is to have the proper plants to make anything you (or your customer) wants in one week.

I have read some people are storing one of every single plant type and color, and that is fine if you have tons of free space in your house and you are one of those "I can't be bothered with it" types. For the rest of us, we have limited room in our house, and want to maximize the storage to as few as possible.

The nine plants you will be storing are: TriBarrel Cactus, Prickly Pear Cactus, Water Plant, Small Palm, Fern, Rushes, Lilies, Snowdrops, Campion. (9 plants)

You store one for each of the major 6 colors [NO plain/white/black] (9 plants x 6 colors = 54 total "fathers")

You store mothers of Cactus & Campions of all 7 colors [Plain too]. (2 plants x 7colors = 14 "mothers" per set). IMHO four sets of mothers is perfect. (54 fathers + (4 sets x 14 mothers) =110 total)

========================================
Why do you need multiple sets of mothers?
If you had one set of mothers and you used a blue cactus as a mother, you no longer have the ability to make more of any desired blue at whim. Sometimes you will have multiple orders, or multiple plants you personally would like. You should have a few mothers, and when you are down to your last of any mother, have it self-pollinate. Better yet, have the father cactus&campions pollinated to the same color and type of itself and let the father grow to produce 8 seeds and don't take the seeds till you are running out of mothers.

Why do you pick four sets of mothers and not three or five?
The goal in my mind was to squeeze the entire production into one measly secure container[125 items max]! A total of 110 plants leaves you with enough room for arranging them within containers, which IMHO is necessary. If you do have a lot of space, feel free to add as many sets of mothers as youd like.

How can I make plain plants with this system?
As long as one parent is plain, it doesnt matter what the other parents color is.
Using this system, you only need plain colored mothers, and use any color to cross-pollinate it.

Do I store dull or bright versions of these plants?
You can get dull/bright children exactly the same regardless, so it does not matter whatsoever.

How do I make bright/dull of any color?
To make a bright child plant, use the same color parents.
To make a dull child, cross colors using a chart.

I know I can cross blue/red/yellow parents to make dull orange/green/purple, but how do I make dull blue/red/yellow?
1st gen seeds: blue/red/yellow
2nd gen seeds: orange/green/purple
Crossing any 1st gen color with any 2nd gen color will result in a dull 1st gen child.
[ie. Dull Blue=Shiny/Dull Blue+ any shiny/dull orange/green/purple]

Um, but how do I make [insert any plant type] here with your system?
To make anything between a fern and a cactus you use a Tri Barrel Cactus for a mother.
To make anything between a fern and a campion you use a Campion as the mother.
1.Cactus = Cactus + Cactus
2.[Single Barrel] Cacti = PricklyPear [Cactus] + [TriBarrel] Cactus.
3.Prickly = Water + Cactus.
4,Snake = Small Palm + Cactus.
5.Water = Fern + Cactus.
6.Century = Rushes + Cactus.
7.Palm = Lillies + Cactus.
8.PonyTail = Snowdrops + Cactus.
9.Fern = Campion + Cactus.
10.Ears = PricklyPear + Campion.
11.Rushes = Water + Campion.
12.Pompas = SmallPalm + Campion.
13.Lillies = Fern + Campion.
14.Balrushes = Rushes + Campion.
15.Snowdrops = Lillies + Campion.
16.Poppies = Snowdrops + Campion.
17.Campion = Campion + Campion.
 
Status
Not open for further replies.
Top