Basara
UO Forum Moderator
Moderator
Professional
Governor
Stratics Veteran
Stratics Legend
Wiki Moderator
UNLEASHED
Campaign Supporter
The Well Stocked Hag Quest kit:
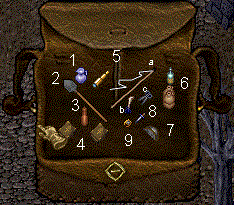
The accompanying picture gives an example of what the travelling kit of a character that makes regular Grizelda the Hag quest runs should contain. It also has a few other optional items to make doing other quests more simple as well. 
1. A glass pitcher. This is needed for the possible second ingredient "swamp water". Option: if one wants to carry around the extra burden (adds another 18 stone weight & 10 items), make this a bag with 8 pitchers, a rune to a solen tunnel entrance, and a rune to the Infiltrators in the Wind tunnels. This will provide all the reusable materials you will need for the Solen Matriarch quest (Powders of Translocation), though you will have to refill the pitchers from a water trough before each solen quest run.
2. A shovel (or pick). This will be needed if one gets the possible third ingredient "Bones buried in hallowed ground". It can also double as your digging tool, if you are a Treasure hunter by trade (many treasure hunters do the Griselda quest for additional maps - they also tend to combine the reagents from the quest with those from their chests, and end up going into the bulk reagent vending business.)
3. Griselda's Hangover Cure. You get this from Griselda every time you show up drunk (from the possible third ingredient "Captain Blackheart's Whiskey", or just being drunk in general). As you really don't need more than one of these (they have dozens of uses before running out - I've emptied ONE in 5 years, after weeks of runs), keep one when you finally get one, then use it before talking to her, as to be sober (and therefore have one less thing to throw away).
4. Rune Books (2 or 3). The basics needed for any Hag Runner. If possible, one should assemble the following set of runes.
- The Hag's house.
- The center of the hedge maze (or more accurately, a few turns away from the entrance to the center).
- The 20 locations Where Zeefzorpul can appear (the ones from the maps)
- Runes to spots good for filling ingredient requests.
6. Booze: Be it cider or liquor/whiskey, you'll need it for the possible third ingredient "Captain Blackheart's Whiskey". You have to get totally plastered drinking with him to earn some of his private stash, so you'll need 5 liquor or 4 cider (or 3 cider & 1 liquor will work). Wine and beer take too long, so don't bother. Of course, if you want to do this on the cheap (or don't want to bother carrying cash), several things (but especially the imps that you'll be killing anyway) carry the stuff on them, so you can usually save up enough booze from quest runs that have a different third ingredient to cover the mission when you do need it.
7. Tricorne Hat: Getting drunk isn't all that's required for Blackheart to give you his juice. You gotta dress the part of a pirate, so you'll need a tricorne hat on when you talk to him while drunk. Any Tricorne will do, from storebought to monster loot to a neon pink frilly thing made from reward cloth. If you want to be really classy, wear the Dread Pirate Hat marti and name your character Westley or Roberts or the like.
8. A Sharp object: Required for the Ingredient "Red Mushroom", if your character isn't carrying a bladed weapon. You can cut any red mushroom in the game for the ingredient (and there's one right outside Griselda's house, even), but you can't pick it if you don't have a blade of some sort. Pretty much only needed as a bag item if the bag is going to be used by a macer (or a magical staff user) at some point.
9. Something to tell time: I recommend a holiday timepiece, just to be classy (that it's a blessed object you'll never lose, even if the bag is looted when you're dead, is a plus). Something a little larger/heavier (a clock) can be made by tinkers or (IIRC) might be purchased from an NPC tinker as well.
a. Fishing Pole (optional): Well, eventually you'll get bored doing all the hag runs, so having this handy will let you do the Elwood quest in Haven (for the obsidian statue pieces) as a respite from being the hag's servant.
b. Mapmaker's Pen (optional): This is not so optional if you're a Treasure Hunter doing the quest repeatedly for maps to dig and to decode for Cartography gains. It so happens that the maps that the imps give you to find old Zeefzorpul are ALSO reusable to draw maps (the OTHER way you get Cartography gains). Double your skill gain chances per run, then, by carrying a pen.
c. Scissors (optional): You never know what you're gonna run into while doing quest runs - it could be something as humorous as a mad cow, or as deadly as someone's Ancient Wyrm from a level 6 on North Jhelom. With a pair of scissors, you're always prepared to squeeze every last bit of loot from these happenstances. Specifically, I'm talking about leathers and bones. Scissors let you cut bone piles (or parts such as the jaw, ribs or pelvis) to where the results stack. Tailors filling bods are pretty much in a constant state of low bone supply. Other things, if you use your knife (see 8.) to cut up the corpse, you can get leather from them - in some cases, spined leather (imps, ratmen, etc), from things you'd kill for the quest anyway. Off the corpse, they come as heavy hides. Use the scissors, and the weight drops to 1 per cut leather.
Runebook setup 101:
This is a guide for setting up a set of hag quest books. The actual coordinates aren't listed, but feel to reply with them, and I'll edit them in later.
Book 1:
1. Hag's House
2. Inside the Hedge Maze (somewhere a short walk from the center). Optionally, one could put this in book two, and have it as the default (moving a map to this book)
3. Zeefzorpul Map Spot - Stable in animal-free east corral on North Jhelom - and easy walk over to the populated corral for Chicken and Sheep
4. Zeefzorpul Map Spot - Ruins south of Yew: Reasonably close to Yew sheep farm, if the site above is low on sheep, due to activity (typically people practicing taming, or bard skills, or getting most of the animals in the pen to attack them, in order to train parry). Can get Swamp water in Yew as well - a few screens north of farm.
5. Zeefzorpul Map Spot - Graveyard ruins south of Spirituality. This is the BEST spot also for digging for the "Bones buried in Hallowed Ground", as it is one of the few graveyards in the game with no undead spawn.
6-16. Special (see below)
Book 2:
1. Zeefzorpul Map Spot - The Bridge of the two kings: The landmark bridge over a pond, between the Skara Brae farms and Destard.
2. Zeefzorpul Map Spots (2 of them) - South of Covetous/West of Vesper, marked half-way between the two sites: I typically use one rune for these two ruins locations, because they are so close to each other, then run in the appropriate direction 1 or 2 screens. The east of the two is the large ruin with the abbatoir.
3. Zeefzorpul Map Spot - A farmhouse West of Britain (and a pain to get to from inside the city, because of the moat and castle in the way - has a fun feature, on shards where the guard zone reaches that far - see below)
4. Zeefzorpul Map Spot - Mining cave East of Destard (may have to mark outside the cave, due to past events making it a no-recall zone).
5. Zeefzorpul Map Spot - The Training Tower (NE of Wind, along the road - also due to events in the past, you may have to mark outside the tower on some shards)
6. Zeefzorpul Map Spot - The mage tower in The Hidden Valley. You have to go through a secret tunnel to get to the valley, in rock wall next to river. A rune to the actual tower makes this trip a lot easier, but beware that the valley has Giant Serpents (remember the scissors I recommended?).
7. Zeefzorpul Map Spot - Ruins Northwest of the Honor Shrine (another hostile reptile hot spot). For some reason, some online guides refer to it as a Trinsic site - that's sorta like referring to New Orleans as "suburban Atlanta", given the relative distance & direction. Heck, it's 10 times closer to the Delucia passage than it is to Trinsic.
8. Zeefzorpul Map Spot - The Thieves' Camp south of Trinsic (more potential hostile reptiles)
9. Zeefzorpul Map Spot - A house in Magincia
10. Zeefzorpul Map Spot - Deep in the Minoc Mines
11. Zeefzorpul Map Spot - Moonglow, in one of the houses on the eastern peninsula, south of the telescope.
12. Zeefzorpul Map Spot - Ruins near Shame
13. Zeefzorpul Map Spot - Skara Brae farms (note that while you can't pick up the fruits & veggies, you can double-click them and eat them off the vine)
14. Zeefzorpul Map Spot - A tent in the woods, across the river SE of Britain Moongate (also a convenient spot for going to a lot of the T-maps south of Britain)
15. Zeefzorpul Map Spot - The Guardpost on the road south of the Bog of Desolation
16. Zeefzorpul Map Spot - The Trapper Huts NE of Vesper.
Ingredients by stage:
Ingredient types are random, but are separated into three stages. Each ingredient occurs only in its assigned stage.
First Ingredient stage
- 5 Deer Heart
- 5 Rabbit's Foot
- 5 Mongbat Wing (note that you can get normal leather from skinning the Greater Mongbats)
- 5 Chicken Gizzard - note that you only get these from normal chickens, not the "Greater Chickens".
- 5 Frog's Leg - bullfrogs or giant toads
- 5 Sheep Liver
- 5 Rat Tail - can be from normal rats or ratmen
- 5 Slime Ooze (slimes or frost oozes; the latter are located in a safer environment)
- 5 Spirit Essence (kill 5 ghoul/wraith/spectre/shade style undead)
- Swamp Water (use a pitcher on a swamp)
- Freshly Cut Red Mushroom
- 5 Lizard Tongue (lizardmen, lava lizards, etc.)
- 5 Bones Buried In Hallowed Ground (use a shovel on a grave)
- Star Chart
- Captain Blackheart's Whiskey
- Book 1, Rune 6: Captain Blackheart (tavern in Buc's Den - have to cross server line to enter door - mark inside to save the hassle, as sometimes the NPCs don't appear when you walk in, and you have to recross the server line a few times).
- Book 1, Rune 7: Britain Sewers - rats, frogs and swamp water as well). The safer option, but less one-stop shopping. Since some of the events of 2005-6, you'll probably have to mark outside the sewers and go in.
- Book 1, Rune 8: Ice Dungeon (ratmen, slime ooze) - You shouldn't run into anything tougher than a rat mage, unless you venture way too far and run into elementals, frozen Ogre Lords or White Wyrms. Best bet is to stay in that first corridor, and kill ratmen and frost Ooze, and let them respawn, instead of hunting deeper for others. The other option is the swamp between Britain & compassion (via rune 15 of book 2), if you really want to go play with Bog Things and Plague Beast Lords.
- Book 1, Rune 9: Outside Umbra, in Malas (housing area across East bridge): This area seems to have nothing but jackrabbits, Skittering hoppers and birds as spawn, so it is the quickest area I've found for getting Rabbit's feet. Just don't go too close to the Corrupted Forest, as anything from Ghouls & Ogres to Elementals & Nightmares could be there.
- Book 1, Rune 10: Moonglow, The bend in the road one screen north of Moonglow Cemetery (great spot for mongbats, spirit essence, and plenty of nearby deer.) Or, one could just take the moongate there (Cemetary is two screens or so East of Moongate)
- Book 1, Rune 11: New Haven. Marked by docks, but a short walk to Elwood's new home.
- Book 1, Rune 12: Vesper Painters for 2nd part of Elwood Quest
- Book 1, Rune 13: Britain Music conservatory (And neighboring theater) for 3rd part of Elwood Quest
- Book 1, Rune 14: Nujelm Theater for 3rd part of Elwood Quest
- Book 1, Rune 15: South Jhelom Theater for 3rd part of Elwood Quest
- Book 1, Rune 16: Trinsic Tinker Guild for 4th part of Elwood Quest.
Existing Runes to use:
Chicken Gizzard/Sheep Liver: Use Book 1 Rune 3 rune for the Jhelom imp spot, and walk two screens to the west to the corral, to the farm.
Mushrooms: use your rune for the Hag, if you don't have one handy elsewhere. There's a mushroom just outside her door.
Star Chart: no rune needed - anyplace in the game (even underground) where it is between 5 PM and 5 AM game-location time will work.
Bones buried in Hallowed Ground: The ruined cemetary (Book 1, Rune 4) where you meet Zeefzorpul south of Spirituality shrine is perfect, as it has graves and no undead.
Fun With Imps:
Ever get tired of listing to that little freak Zeefzorpal? He may be Yellow, but there's still a way to kill the imp. If you get the Britain farm imp location (also worked at the Magincia location, when it had a guard zone), be fast on a guards macro as you blow the flute, and you can guard-whack the little slimeball. For some reason, there's just something satisfying about wasting the sucker.
I personally discovered this after suffering the rather disturbing fate of being KILLED by Zeefzorpal. I was running up the road to Yew, and got jumped by a couple liches, fighting a running battle. I killed the last lich with ONE HIT POINT LEFT - then took one more step, the imp appeared, took a swing at me and killed me dead. After rezzing from a nearby healer, I found the map was to Magincia, and one of the local NPCs yelled for the guards when the imp appeared - and to my amazement, they offed him. After then, I'd intentionally try to time a yell for the guards myself, at that spot and the Britain one, as I used the flute, and succeeded about half the time.
Last edited:
")