<font class="post">
The art of real-estate in UO.
<font color=green>
Buying a new house
Selling a house
Preventing loss of your house(s)
Finding open land to place a new house
Placing a house
Demolishing a house
Upgrading a house to a Customized home.
Upgrading the plot/land size of your existing home.
How to utilize the functions of a house.
How to find houses that are decaying, the art of IDOC Camping.
The basics of house placement rules.
The Large Tower and the mistery of the wings.
</font color=green>
=/=/=/=/
<font color=green>Buying a new house</font color=green>
=/=/=/=/
Buying a house in game is rather simple. After the negotiation is made both the seller of the house and the buyer stand within 2 tiles outside of the house at the house sign post. The seller will start the trade, you being the buyer will have up to 2 windows appear:
After placing the agreed payment in the trade window, finish the trade, you will receive a message stating the house is now yours, Double clicking the sign post and getting the house menu will confirm that.
The house will automatically be set to a primary house, it will refresh automatically unless your account status becomes inactive due to non-payment. (see <font color=blue>Primary Status</font color=blue>, & <font color=blue> Inactive Accounts</font color=blue>)
Your account will now have a 7 day house timer set from the time of the point of sale. (see <font color=blue>7 Day House Timer</font color=blue>)
=/=/=/=/
<font color=green>Selling a house </font color=green>
=/=/=/=/
To sell your home, both you and the buyer need to be within 2 tiles of the house sign post, outside of the house. Bring up the housing menu then go to the ownership menu, select transfer/trade this house. You will then target the player your trading to and click, if they are too far away you will get a message explaining has such. Once you click the player one of 2 things will happen:
After a successful trade, in white text (normally) you will get a message stating that you have successfully traded the house, be sure to verify that you no long are able to get the house menu up, sometimes a new buyer will cancel the trade by accident. (oh and be sure you got your payment)
If you own more than one home, meaning you have an account that has grandfathered houses on it, note that selling your houses does not make you loose the grandfathered status of the remaining, in fact it does absolutely nothing to your account. It is safe to sell. No house timer is set, nor removed by selling a house.
=/=/=/=/
<font color=green>Preventing loss of your house(s)</font color=green>
=/=/=/=/
If you have an account with multiple homes across different shards, or even the same, or if you just own one home, you should be aware of ways you can loose them:
*see <font color=blue>Condemned</font color=blue>
**see <font color=blue>Inactive Accounts</font color=blue>
=/=/=/=/
<font color=green>Finding open land to place a new house</font color=green>
=/=/=/=/
Hole Hunting in a nutshell
A contribution to the book of housing from Cpl Punishment)
Okay... The topic has come up enough to where I think a tutorial of sorts is needed. Before I start I want to make one thing absolutely clear - do not ask me for any house map files. I think of mapfiles as a rite of passage - If you want to get a house (and place many others), you have to do your time doing the mundane stuff before you get to have fun. If you can't walk a shard once, why do you think you'll take the time to walk the shard looking for spots? This is not a quick and easy process by any stretch of the imagination.
Now for the fun /php-bin/shared/images/icons/wink.gif
Requirements
<ul>[*]UO AutoMap[*]UO Assist[*]Patience and Persistance[/list]
I recommend that you let UOAM build the quickest files possible, don't display statics, and set houses so they are filtered at 1/2X.. I forget the other settings offhand but those are the big ones.
Basics
All you are doing is mapping where houses fit on one server and looking at the same or another shard looking for the "differences". You can find open spots or upgrades by using this technique. That is the ultimate goal of this FAQ.
Making a map
First of all we need a mapfile. Don't add your houses to one of the files that comes with UOAM because if it auto-updates, you'll lose all of your work. Try to name your mapfile something meaningful (if you walk multiple shards try using something like Shard-Month-Year - My names are goofy in the example do what I say not what I do /php-bin/shared/images/icons/wink.gif )
From UOAM Toolbar go to Places->Edit or Go To Labels->Files tab
[image]setting1.jpg[/image]
Click Add and type something in.
[image]map_file_names.jpg[/image]
Now go to the UOAssist tab.
[image]maphouse_to_file.jpg[/image]
Make sure that you select the file name and check the Show items on UO's Radar Map.... You're ready to start mapping on your favorite shard. Remember: You're logging. If you switch shard without disabling logging, you're going to overwrite your map file.
Newbify yourself, get a horse, a few runes, a runebook, and a few mark scrolls. Now go run around like crazy. Make sure you run through the woods and the most obscure places you can find! RUN EVERYWHERE!!!
I can't remember who posted mapping Asian shards because the placement is "truer" or something like that. It's a good idea.. I'm doing exactly that right now.. trouble is I'm lazy and kind of burned out w/UO right now.. anyways...
Once you have completed mapping, disable logging and the "display items shown in UO's Radar Map" and go to another shard. I use the Radar in large mode and UOAM in 1X view.. double click UOAM's window to make it lay on top of UO. If you arrange them right it should look like this. For this example I logged into test shard (Radar) with a Chessy house file.
[image]rightside_both.jpg[/image]
Take a look - The area you can actively see in the radar view is displayed -
[image]rightside_diff.jpg[/image]
Where are the holes?- Here -
[image]whats_open.jpg[/image]
It's possible to use the same map files for Trammel and Fellucia. On the Files tab, there is a place on the lower right hand corner where you can override your current settings - Useful for displaying a Trammel house file while you're in Fel. It's also possible to use UOAM only by disabling logging and having "Display items that show up in UO's Radar Map" checked while walking another shard. It's real interesting to see what fits where and you will be able to see the overlap - however you may miss some holes if you aren't paying close attention.
UOAM logs house coordinates by the house's front door (I believe).. The spot UOAM tells you to place is wrong. Zoom UOAM to 8X view and walk to the spot yourself /php-bin/shared/images/icons/wink.gif If you have a wheel mouse, it's possible to select the zoom by clicking on UOAM and rolling your wheel back and forward. Easy enough.
If you're on a heavily populated shard, you'll notice some spots that overlap. I'd look into upgrading if you see that the area is large enough.
Do not get hung up if you can't place. The house on the other shard may have been improper. Terrain changes and house placement rules seem to change by the day. Mark a rune - If the spot looks wide open and you're getting the "invalid terrain" message, it may be worth your while to page a GM.. Your results may vary, more often than not I get the orange button.. don't get dissuaded, it's all about patience and persistence.
Ghost Mapping
Running around looking at the map file and radar window instead of the main window can be nauseating and your character can be seriously killed. If you're newbified your equipment is safe and you can continue to run the shard as a ghost without worrying about that silly "death" thing! Ghost mapping the Trinsic swamps or peninsula south of Destard is highly recommended. It's fairly difficult to pay attention to maps while you have Giant Serpents on your tail and you're running into impassible objects every 4 seconds ... You can still map houses as a ghost!!!
We are still in Phase 1 1/2.. The time to map is now.
Side Notes
Your UOAM files can get kind of big, and when that happens UOAM will slow down and appear to lock up when you add/remove houses or try to change map files. Your UO client can lag severely if this hapens. I'm running a P3 500, it may or may not lock up your 50 bigahertz CPU.
If you know someone that's good at data mangling, try to optimize the list by placing it in X Y Sort order - it seems to speed up UOAM.
Many thanks to Cpl for this contribution
Circle of Transparency Hunting
Now that you have hole hunting down, understand that hole hunting is great for Trammel and Felucca, however in Malas it is a bit different due to the huge amount of open land area, there are a lot of combinations of houses in a area of land. Hole hunting in Malas will be best used up next to and in forest, close to mountain sides or star fronts (ocean fronts). To hunt for housing in Malas one of the best methods you can use is the Circle of Transparency Method, Turn up your Circle to 200, then walk around, you will see what others do not, and that is additional land mass that is being obstructed by the larger 4 story homes, especially those homes that have walls on the top floor.
Remember there are permanent objects in the game that can prevent you from placing a house, that are in no short order:
Some things to keep in mind:
Objects that can not be walked over now apparently can be within one tile of the INSIDE of the foundation. I have done this a few times myself, in the past before AoS, it was a rarity that I could place with an object up against the inside foundation of a home. This is good news, really. Just don’t bank on it completely.
=/=/=/=/
<font color=green>Placing a house</font color=green>
=/=/=/=/
Once you find a area of land in which you believe a house can fit, double click a house placement tool (see <font color=blue>Equipment</font color=blue>). Select the size you feel could fit. Keeping the list of blocking objects in mind, start with the smallest possible foundation and then work your way up. If you reach a size that fits, don’t stop trying to get larger, keep going until it is invalid.
When you get your first invalid, you’ll need to find out if it is due to terrain, landscape, or housing. If it is terrain, or a small hill you may be able to keep going in size, moving the terrain to within the inside of your foundation. If it is a house, you may need to stop, or try expanding north to south opposed to going east to west or vis-versa.
Once you are satisfied with the size of the plot, simply click ‘Okay’ on the warning gimp that comes up. You will have the dirt plot there ready for you to Customize!
=/=/=/=/
<font color=green>Demolishing a house</font color=green>
=/=/=/=/
Top 2 reasons to demolish a house:
Remember that demolishing a house does not in any way shape or form remove your housing timer. (see <font color=blue>7 Day Timer</font color=blue>)
=/=/=/=/
<font color=green>Upgrading a house to a Customized home.</font color=green>
=/=/=/=/
So you have a Villa? Log? Tower? Castle? And you want to change them to a customized dirt plot? First you need to have the AoS upgrade installed and the account that owns the house activated with AoS, then you need to find out if it is possible to even upgrade it at all! Some homes do not upgrade, L-Shapes, Castles and Keeps are those currently. But to find out for sure, click the Customize button from the house menu, if ‘Convert this house to a dirt plot’ is an option, then yes! Before you do, follow some of these helpful and growing list of tips.
To put out a few fears, converting a home to a dirt plot does not affect your house timer if currently active, nor does it affect your grandfather status of your home(s).
You will receive a good portion of gold for the value of the building being converted, it will be placed in your bank box. I believe currently it is 100% but it may be that 90% now, is returned, then you are immediately charged from your bank box the value of the dirt plot. After customizing all items are placed into a moving crate for you.
A side note: after setting up the foundation of the house and getting the layout you want, you will need to move the stuff out of the crate and to the locations you wish them to be at. Be sure to have everything out of the moving crate before committing on the house.
If the moving crate is in an inconvenience spot, you can click ‘relocate moving crate’ and it will be placed somewhere else at random.
That’s all there is to changing to a customized house. For tips on how to design a house and using the house décor tool, uo.com has a whole section on how to use it, but you’ll see a few links to either threads or websites in the FAQ.
=/=/=/=/
<font color=green>Upgrading the plot/land size of your existing home.</font color=green>
=/=/=/=/
A few things of note if your thinking on updating the size of your plot:
Okay, I got a little ahead of myself. So, to upgrade a plot to a larger size, one must demolish the existing plot, this is not a move for the weak of heart, then using either #x# plots or older house designs, place a new one. If you have emptied your house of all add-ons, plants, water barrels, everything, then you shouldn’t worry about residue after demolishing a house. However if you decided to leave a few lockdowns (elevated via the fish steak death robe decay method) or a few add-ons like water barrels’ troughs, rugs,,ect. You are risking the ability to place a larger house, and in some cases the original house size. Clean up these to give you more of a chance of less problems.
When you demolish the house, the items left in the house will fall to the ground where they were at, if they were on the 3rd floor then they will stack on top of each other and the tile matching on the ground. Clicking on them once will release/unlock them then you can move them. HOWEVER, this does not need to be done for 98% of the items you’ll come across, the first time your test for a larger size actually works, they all will be moved under the house sign.
One thing to test for, and which I have seen be a issue, is when, has mentioned above, items that were elevated prior to the use of the home décor tool. These will appear to hang even thou the house has fallen, if you can, you will want to remove these prior to the demolish, if not, stand on the tile the item would have fallen to, then click the item, then drag it to your backpack, if you cant seem too do that, your not standing “under it”, the illusion is you will be a few tiles south of the item.
Any house add-ons that were left behind after a demolish can be axed, simply double click a axe then target the add-on.
Guildstones: Have the guild master move the guild stone to another house for the time being. Recently used guildstones cannot be moved by anyone but the guild masters and GM’s. This means if you demolish a house that had a Guildstone in it, and if it was used recently, then you cannot even replace the land with the same size house, you have to place around it or page a GM to move it. GM’s are pretty good at moving a guildstone that has become a problem for house upgrading or placements
=/=/=/=/
<font color=green>How to utilize the functions of a house.</font color=green>
=/=/=/=/
This is fairly simple, for this I'll point you to uo.com website.
=/=/=/=/
<font color=green>The basics of house placement rules.</font color=green>
=/=/=/=/
First lets start with the standard house rules you should know. We will focus on a few of them listed.
Okay a few basic no brains, you cannot place on water, mountains, trees, in caves.. ect.
So why is there hope for placing house?
Because houses are failing, new land has opened, people are moving..ect.
Even Terrain
To get a good understanding of what a foundation is, you can do this experiment, go to any house West or East side, and turn up your circle of transparency option to 200. then take a look at the house, you’ll notice the tiles of the house directly next to you are visible but beyond that you can see the terrain the house is on. If you walk completely around the outside of the house you will see the entire foundation. This foundation has to be placed on even terrain, no part of the foundation can be elevated higher/lower than another. However the inside foundation can be uneven to an extent.
Log cabins may have the advantage when placing over tough terrain with hills, maybe OSI intended this to be so, think on this, you have to walk up 2 or 3 tiles to get to the door, so the floor is a whole 2-3 tiles above ground.
Obstacle free outer perimeter of the house
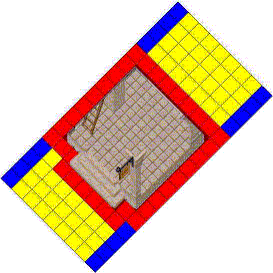
If you look at the image above, the outer perimeter is in red, you must be able to walk this perimeter without being stopped by some object.
This perimeter has been known to be the beginning of a drop in a hill.
Tiles free on the North and South side of the house.
Also from looking at the above image, you have the 5 tile rule being shown in yellow. This area can have really anything in it, except for other houses, and some in game objects.
The blue is where some house combination allow placement. It is not a guarantee, but it may be a possibility. Below is an example of what I mean.
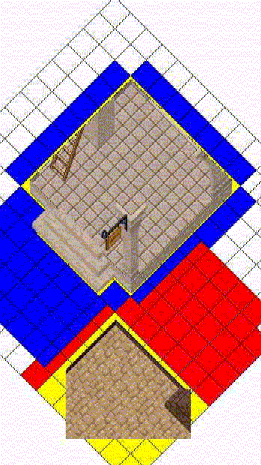
Here I am using a Villa and a Small Marble. The most important thing to remember is not to invade the 5 tiles directly to the South of the house or to the north with your house, nor should you invade the 1 tile directly East or directly West of the house. The Blue/Red tiles represent the mixture of the 1 tile to the EAST for the Marble and the 5 tiles to the North for the Villa, both houses are using the area to supplement their requirements.
Things you normal can’t place a house foundation on but can be within the footprint
If you cannot walk threw it, a foundation cannot be on it. That is pretty much the rule. Some flowers can also prevent a foundation from working also. If you’ve traveled around enough, you may see a foundation appear to be on top of the flower, however the flower graphic is simply overlapping the tile.
A thing to keep in mind, walk threw objects are not a 100% thing either way, try to place on top, and if that does not work, simply make the house foundation larger and cause the object in question to become part of the inside of the house where it is less of an issue.
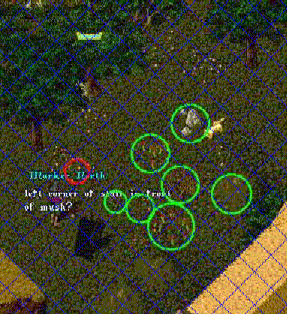
This is a prime example of what I am meaning.. the picture above has circled the objects that can be inside the foundation.
Notice I have a rock of good size, a lot of flowers and a small hill. All of which fit nicely into the inside of a houses footprint.
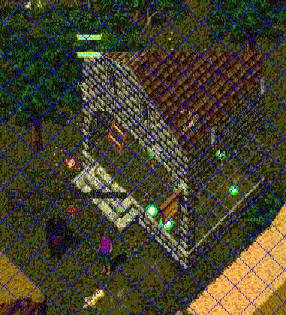
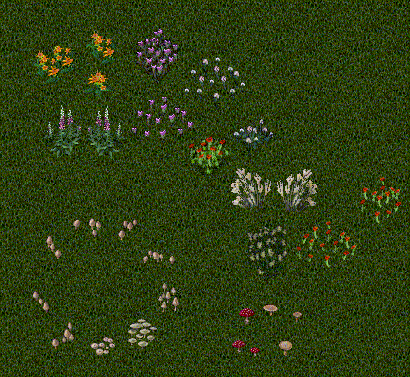
These are some of the plants that can be within the footprint.
Since AoS, some people have also manage to place the small patches of crystals (not the large ones), into and right under the foundation of the house.
West and East side spacing
Take a look at Figure 1.1 and Figure 1.2
In figure 1.1 you can see the problem people are having, they think the gap in front of ghost Flippy is wide enough to walk through, while in fact it is not. They are not the only ones, the land survey tool used to say this is a valid spot, as long as all the other requirements were met.
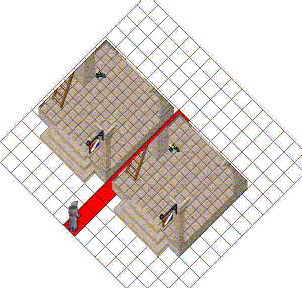
Figure 1.1
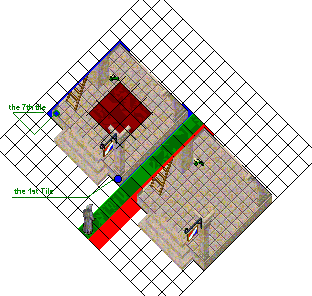
Figure 1.2
Figure 1.2 is the correct spacing gap and it is a must to have. The only time you will see houses close like Figure 1.1p is in Felucca.
=/=/=/=/
<font color=green>How to find houses that are decaying, the art of IDOC Camping</font color=green>
=/=/=/=/
Yes even since the release of AoS, houses are still decaying, and what is even better, if you havent noticed allready some houses are showing there decay rate.
So which are, or are not?
Which are defenitly not. Primary Set houses.
Which are defenitly Decaying and showing. Condemned Grandfathered houses.
Which are showing the decay status but not decaying yet (not until phase 3) GrandFathered houses.
The decay status can be viewed by clicking a house sign. The Status will be something like, This house is like new, or slightly worn, fairly worn, greatly, and Indanger.
In the past a house would decay away in about 6-7 days. Now that time can vary due to how the house has gotten to its InDanger Status.
Three ways
If 1 is the case it should decay on the 15 day of inactivity. Sooner if Phase 3 is implemented.
IF 2 is the case is should decay within 5 days.
If 3 is the case, it should decay at normal rate, but can vary due to spawn and location of the area.
So if you find a house that is IDOC follow these steps, they can help.
=/=/=/=/
<font color=green>The Large Tower and the mistery of the wings.</font color=green>
=/=/=/=/
The questions have been asked many times. "'Can you explain the footprint of a large tower" or "'what is the deal with the wings" or perhaps you are thinking of buying a few houses near you and upgrading to a large tower. Well, you're not the first. This is to help you decide if you want to take the risk of upgrading. On this page we'll use a large tower as an example.
Let's first setup a tower's footprint by placing colored clothing around where the foundation should be, along with a few other tricks.
First I arrive and place the pieces of cloth all around the foundation of the house. (I call these Markers) Figure 6.1
I had to work a bit on the wings, the South side is easy until I try to figure out when to stop! How?
First I got up next to the wall on the East Side Corner
Figure 6.2 Notice how you can see inside of the tower, and that there is no support beam above me? Next I take 2 steps forward Figure 6.3 Now you can see the support beam of the wing! The support beam acts like the foundation does, It is picky about what can be under it. Next, I lay down a few Blue pieces of clothing to mark the area under the wing. But the question is how do I know where to stop? How do I know where the edge of the wing is? It's easy; I take one step forward.. Figure 6.4
Now I see the wing in its wholeness, my theory is this 'While I am under the foundation I will only see parts of the foundation. Once I'm out from under it I see all of the wing.' Using this theory I place my white pieces of cloth on the tiles going South to North, in other words, the tiles I'm standing on in the Figure 6.2 thru 6.4
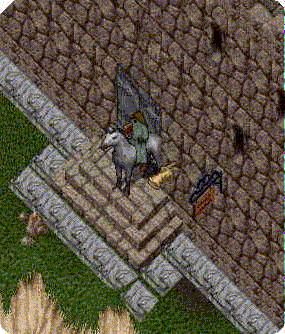
Figure 6.1
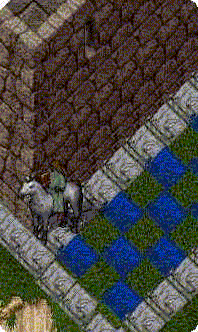
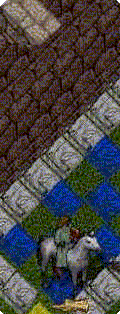
Figure 6.2Figure 6.3
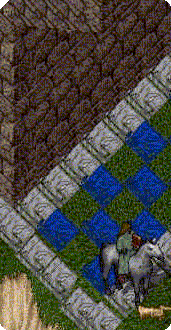
Figure 6.3
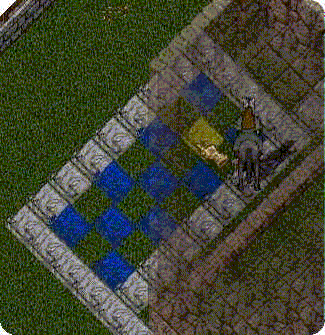
Figure 6.5
In Figure 6.5 I place blue markers under the west wing also. Now we take our markers to the Rook and Mark the Wings.
To the right on Figure 6.6 I have placed Yellow Markers for what I note has the floor of the east wing. I also placed Red markers on the outer foundation. When the tower is taken down, the theory is the yellow will fall on top of the inner Blue markers on the ground, the red should fall on the outer blue markers on the ground because those outer blue markers represent the outer foundation of the wing. Well when the tower was deeded the Yellow markers fell right where I thought they would, the Red markers however stayed where they where, due to being on the foundation and not on the floor.
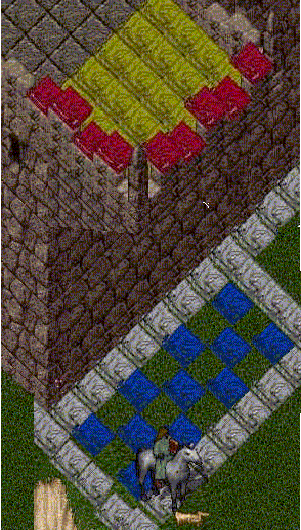
Figure 6.6
The next step is re-deeding the house.. Even on the Test Rewards 1 Shard, the shard that has time warped every night, I felt nervous deeding the place... BUT I did!.
After deeding I had sort of a panic attack. Someone out of the blue showed up, and I wanted to deed the tower to see the stuff moved out of the way, so I was quick in taking pictures, and then I placed the house in the same spot. Kinda easy when the outline is already there.
Notice the Red Markers? They all got put under the sign, since they were 'floating' in the air, and did not fall to the ground.
Figure 6.7
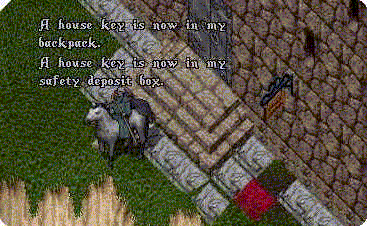
Figure 6.8
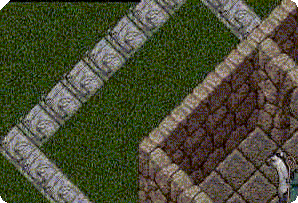
Figure 6.9
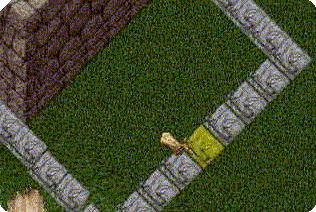 Figure 6.10
This testing, laying of clothing and deeding, has created a footprint for us to use when placing a house. Although there are still some question has to what plants can be under the wings and on the white marker area, it is still useful just to know if you have the space or not. I took a picture of the ground after the house was deeded. I show this to you know, but with a lot of lines that represent the conclusions I came to.
Remember :
Don't test deeding your house while the server is saving. Wait until it has stopped saving and then try.
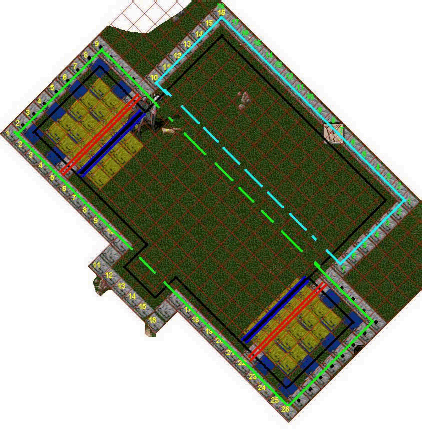
Figure 6.11
Unlike its smaller version, a small tower, the large tower is not a "perfect" square or rectangle. It is composed of rectangles. 3 to simplify.
Going from South to North we have
We can simply say that including the stairs and 'free for walking' tiles around foundation, a towers footprint is
26 West to East by 18 North to South (26x18)
But we do not live in the land of ample space. So let's take a closer look at the footprint.
The Black line is the outer foundation for a large tower, this is including the wings.
The Bright Green line is front side of the tower, the Blue is the back side.
You should consider the footprint to be the following : 26x9 + 18x7
The front side rectangle is 26x9 and the back side is 18x7
I've numbered it all for ya..
Heck you can even make your own outline in minutes. Just reference my picture for the inner corners and your set!
Figure 6.11 Legend
A few rules to recap..
The foundation cannot have any house blocking terrain, this includes uneven terrain, some plants, most rocks, and the bumpy area of a fallen log.
The tiles directly outside of the foundation (the white markers) require that a person be able to walk through anything that might be on the square.
Other houses need to be clear of your tower by 5 tiles on the North and South facing walls, this rule applies to the wings also. If a house is on the same tile lines as your stairs are, (the middle 2 tiles on the stairs that are right in front of the doors) your tower will need to be 6 tiles away from the house, not 5.
Some ground objects that normally block house placement have been know to be under the clothing squares marked with black dots, such as small rocks and bushes.
The art of real-estate in UO.
<font color=green>
Buying a new house
Selling a house
Preventing loss of your house(s)
Finding open land to place a new house
Placing a house
Demolishing a house
Upgrading a house to a Customized home.
Upgrading the plot/land size of your existing home.
How to utilize the functions of a house.
How to find houses that are decaying, the art of IDOC Camping.
The basics of house placement rules.
The Large Tower and the mistery of the wings.
</font color=green>
=/=/=/=/
<font color=green>Buying a new house</font color=green>
=/=/=/=/
Buying a house in game is rather simple. After the negotiation is made both the seller of the house and the buyer stand within 2 tiles outside of the house at the house sign post. The seller will start the trade, you being the buyer will have up to 2 windows appear:
- If you currently have a house, you will get a warning explaining that all your homes on this shard and other shards on this account will become condemned, and that in no way will any sort of magic help you reverse it. (see <font color=blue>Condemned</font color=blue>).
- A trade window will appear, in it will be a neon blue deed with the house information on it.
- That with the Log & Lat Cords of the house, it will point you to dead center of the house.
After placing the agreed payment in the trade window, finish the trade, you will receive a message stating the house is now yours, Double clicking the sign post and getting the house menu will confirm that.
The house will automatically be set to a primary house, it will refresh automatically unless your account status becomes inactive due to non-payment. (see <font color=blue>Primary Status</font color=blue>, & <font color=blue> Inactive Accounts</font color=blue>)
Your account will now have a 7 day house timer set from the time of the point of sale. (see <font color=blue>7 Day House Timer</font color=blue>)
=/=/=/=/
<font color=green>Selling a house </font color=green>
=/=/=/=/
To sell your home, both you and the buyer need to be within 2 tiles of the house sign post, outside of the house. Bring up the housing menu then go to the ownership menu, select transfer/trade this house. You will then target the player your trading to and click, if they are too far away you will get a message explaining has such. Once you click the player one of 2 things will happen:
- If the player already has a home on any shard, you will get a message stating that the player is being asked if they wish to receive the house, (this is the warning message they are getting saying there houses on all shard are going to become condemned if they go threw with the trade). If they click okay, then your to #2.
- A trade window will automatically appear, with a neon blue deed, this represents your house. Do not click any checkbox until payment items appears in the trade window.
After a successful trade, in white text (normally) you will get a message stating that you have successfully traded the house, be sure to verify that you no long are able to get the house menu up, sometimes a new buyer will cancel the trade by accident. (oh and be sure you got your payment)
If you own more than one home, meaning you have an account that has grandfathered houses on it, note that selling your houses does not make you loose the grandfathered status of the remaining, in fact it does absolutely nothing to your account. It is safe to sell. No house timer is set, nor removed by selling a house.
=/=/=/=/
<font color=green>Preventing loss of your house(s)</font color=green>
=/=/=/=/
If you have an account with multiple homes across different shards, or even the same, or if you just own one home, you should be aware of ways you can loose them:
- Acquiring a new house on any shard will cause your established homes to become condemned.*
- If you try to upgrade the plot size of one of your established homes, the other houses on all shards will become condemned.*
- Setting one of your established homes status to a Primary house will cause your other homes to become condemned.*
- Non-payment of the account for longer than 10 days will cause all your homes to become condemned. Payment received after the 10 day mark but before day 15 of non-payment, you will be able to keep one of them, but only one, and even then there is a catch. **
*see <font color=blue>Condemned</font color=blue>
**see <font color=blue>Inactive Accounts</font color=blue>
=/=/=/=/
<font color=green>Finding open land to place a new house</font color=green>
=/=/=/=/
Hole Hunting in a nutshell
A contribution to the book of housing from Cpl Punishment)
Okay... The topic has come up enough to where I think a tutorial of sorts is needed. Before I start I want to make one thing absolutely clear - do not ask me for any house map files. I think of mapfiles as a rite of passage - If you want to get a house (and place many others), you have to do your time doing the mundane stuff before you get to have fun. If you can't walk a shard once, why do you think you'll take the time to walk the shard looking for spots? This is not a quick and easy process by any stretch of the imagination.
Now for the fun /php-bin/shared/images/icons/wink.gif
Requirements
<ul>[*]UO AutoMap[*]UO Assist[*]Patience and Persistance[/list]
I recommend that you let UOAM build the quickest files possible, don't display statics, and set houses so they are filtered at 1/2X.. I forget the other settings offhand but those are the big ones.
Basics
All you are doing is mapping where houses fit on one server and looking at the same or another shard looking for the "differences". You can find open spots or upgrades by using this technique. That is the ultimate goal of this FAQ.
Making a map
First of all we need a mapfile. Don't add your houses to one of the files that comes with UOAM because if it auto-updates, you'll lose all of your work. Try to name your mapfile something meaningful (if you walk multiple shards try using something like Shard-Month-Year - My names are goofy in the example do what I say not what I do /php-bin/shared/images/icons/wink.gif )
From UOAM Toolbar go to Places->Edit or Go To Labels->Files tab
[image]setting1.jpg[/image]
Click Add and type something in.
[image]map_file_names.jpg[/image]
Now go to the UOAssist tab.
[image]maphouse_to_file.jpg[/image]
Make sure that you select the file name and check the Show items on UO's Radar Map.... You're ready to start mapping on your favorite shard. Remember: You're logging. If you switch shard without disabling logging, you're going to overwrite your map file.
Newbify yourself, get a horse, a few runes, a runebook, and a few mark scrolls. Now go run around like crazy. Make sure you run through the woods and the most obscure places you can find! RUN EVERYWHERE!!!
I can't remember who posted mapping Asian shards because the placement is "truer" or something like that. It's a good idea.. I'm doing exactly that right now.. trouble is I'm lazy and kind of burned out w/UO right now.. anyways...
Once you have completed mapping, disable logging and the "display items shown in UO's Radar Map" and go to another shard. I use the Radar in large mode and UOAM in 1X view.. double click UOAM's window to make it lay on top of UO. If you arrange them right it should look like this. For this example I logged into test shard (Radar) with a Chessy house file.
[image]rightside_both.jpg[/image]
Take a look - The area you can actively see in the radar view is displayed -
[image]rightside_diff.jpg[/image]
Where are the holes?- Here -
[image]whats_open.jpg[/image]
It's possible to use the same map files for Trammel and Fellucia. On the Files tab, there is a place on the lower right hand corner where you can override your current settings - Useful for displaying a Trammel house file while you're in Fel. It's also possible to use UOAM only by disabling logging and having "Display items that show up in UO's Radar Map" checked while walking another shard. It's real interesting to see what fits where and you will be able to see the overlap - however you may miss some holes if you aren't paying close attention.
UOAM logs house coordinates by the house's front door (I believe).. The spot UOAM tells you to place is wrong. Zoom UOAM to 8X view and walk to the spot yourself /php-bin/shared/images/icons/wink.gif If you have a wheel mouse, it's possible to select the zoom by clicking on UOAM and rolling your wheel back and forward. Easy enough.
If you're on a heavily populated shard, you'll notice some spots that overlap. I'd look into upgrading if you see that the area is large enough.
Do not get hung up if you can't place. The house on the other shard may have been improper. Terrain changes and house placement rules seem to change by the day. Mark a rune - If the spot looks wide open and you're getting the "invalid terrain" message, it may be worth your while to page a GM.. Your results may vary, more often than not I get the orange button.. don't get dissuaded, it's all about patience and persistence.
Ghost Mapping
Running around looking at the map file and radar window instead of the main window can be nauseating and your character can be seriously killed. If you're newbified your equipment is safe and you can continue to run the shard as a ghost without worrying about that silly "death" thing! Ghost mapping the Trinsic swamps or peninsula south of Destard is highly recommended. It's fairly difficult to pay attention to maps while you have Giant Serpents on your tail and you're running into impassible objects every 4 seconds ... You can still map houses as a ghost!!!
We are still in Phase 1 1/2.. The time to map is now.
Side Notes
Your UOAM files can get kind of big, and when that happens UOAM will slow down and appear to lock up when you add/remove houses or try to change map files. Your UO client can lag severely if this hapens. I'm running a P3 500, it may or may not lock up your 50 bigahertz CPU.
If you know someone that's good at data mangling, try to optimize the list by placing it in X Y Sort order - it seems to speed up UOAM.
Many thanks to Cpl for this contribution
Circle of Transparency Hunting
Now that you have hole hunting down, understand that hole hunting is great for Trammel and Felucca, however in Malas it is a bit different due to the huge amount of open land area, there are a lot of combinations of houses in a area of land. Hole hunting in Malas will be best used up next to and in forest, close to mountain sides or star fronts (ocean fronts). To hunt for housing in Malas one of the best methods you can use is the Circle of Transparency Method, Turn up your Circle to 200, then walk around, you will see what others do not, and that is additional land mass that is being obstructed by the larger 4 story homes, especially those homes that have walls on the top floor.
Remember there are permanent objects in the game that can prevent you from placing a house, that are in no short order:
- Other houses. (see House Spacing)
- Rocks, logs, twigs, water.. objects that you cannot walk over basically, these objects cannot be directly under the foundation of your home, stairs, or within 1 tile of the outside of the foundation. (see <font color=blue>House Foundation Rules </font color=blue>)
- No housing Zones. If you get a message saying “Housing cannot be created in this area.”, then it is a no housing zone for a number of possible reasons:
a. Its in a guarded zone.
b. Next to an entrance that needs to be free of houses.
c. It’s a spawn zone.
d. It’s open land, somepeople call it landscape.
e. Its land in Malas that is being reserved for possible future housing.
- Water barrels that have water in them, you will need to empty those out.
- House Add-Ons that did not disappear after a house either A-Fell, or B-Demolished. (see <font color=blue>IDOC Camping</font color=blue>)
- The mask of ships have been known in the past to prevent houses from placing.
- Dead corpses that you can walk under.
- Gradient Hills that are more than 1 tile taller than the foundation, there are exception to this. (see <font color=blue>How to Squeeze a House In</font color=blue>)
- Uneven terrain directly under the foundation of the house.
(see <font color=blue>Foundation</font color=blue>)
Some things to keep in mind:
Objects that can not be walked over now apparently can be within one tile of the INSIDE of the foundation. I have done this a few times myself, in the past before AoS, it was a rarity that I could place with an object up against the inside foundation of a home. This is good news, really. Just don’t bank on it completely.
=/=/=/=/
<font color=green>Placing a house</font color=green>
=/=/=/=/
Once you find a area of land in which you believe a house can fit, double click a house placement tool (see <font color=blue>Equipment</font color=blue>). Select the size you feel could fit. Keeping the list of blocking objects in mind, start with the smallest possible foundation and then work your way up. If you reach a size that fits, don’t stop trying to get larger, keep going until it is invalid.
When you get your first invalid, you’ll need to find out if it is due to terrain, landscape, or housing. If it is terrain, or a small hill you may be able to keep going in size, moving the terrain to within the inside of your foundation. If it is a house, you may need to stop, or try expanding north to south opposed to going east to west or vis-versa.
Once you are satisfied with the size of the plot, simply click ‘Okay’ on the warning gimp that comes up. You will have the dirt plot there ready for you to Customize!
=/=/=/=/
<font color=green>Demolishing a house</font color=green>
=/=/=/=/
Top 2 reasons to demolish a house:
- To try and place a larger house plot
- Due to insane spawn rate, no one will buy it, and you have found a better one, and you figure the gold you get from re-deeding is better than nothing at all. (You will loose 10% of the gold put to the house originally.)
Remember that demolishing a house does not in any way shape or form remove your housing timer. (see <font color=blue>7 Day Timer</font color=blue>)
=/=/=/=/
<font color=green>Upgrading a house to a Customized home.</font color=green>
=/=/=/=/
So you have a Villa? Log? Tower? Castle? And you want to change them to a customized dirt plot? First you need to have the AoS upgrade installed and the account that owns the house activated with AoS, then you need to find out if it is possible to even upgrade it at all! Some homes do not upgrade, L-Shapes, Castles and Keeps are those currently. But to find out for sure, click the Customize button from the house menu, if ‘Convert this house to a dirt plot’ is an option, then yes! Before you do, follow some of these helpful and growing list of tips.
- Simplify the number of lockdowns you have, the less you have the easier it is to build stack what can be stacked deed what can be commodity deeded.
- Use 1 color of box and put only a certain type of items in it. Red = Decorations, Blue= Armor and Clothing, Green = Plants… some other color for add-ons.
To put out a few fears, converting a home to a dirt plot does not affect your house timer if currently active, nor does it affect your grandfather status of your home(s).
You will receive a good portion of gold for the value of the building being converted, it will be placed in your bank box. I believe currently it is 100% but it may be that 90% now, is returned, then you are immediately charged from your bank box the value of the dirt plot. After customizing all items are placed into a moving crate for you.
A side note: after setting up the foundation of the house and getting the layout you want, you will need to move the stuff out of the crate and to the locations you wish them to be at. Be sure to have everything out of the moving crate before committing on the house.
If the moving crate is in an inconvenience spot, you can click ‘relocate moving crate’ and it will be placed somewhere else at random.
That’s all there is to changing to a customized house. For tips on how to design a house and using the house décor tool, uo.com has a whole section on how to use it, but you’ll see a few links to either threads or websites in the FAQ.
=/=/=/=/
<font color=green>Upgrading the plot/land size of your existing home.</font color=green>
=/=/=/=/
A few things of note if your thinking on updating the size of your plot:
- You can demolish a house anytime you want, but you cannot always place one when you want. Be sure that you are not currently under a house placing restriction, to make sure you are not, simply double click a ‘House Placement Tool’ and look for a messaging stating you have to wait xxx hours before placing. (see <font color=blue>7 Day Timer</font color=blue>)
- When possible use either other shards for a guide on what can be placed, or try it on the test shard. (see <font color=blue>Using Test Shards</font color=blue>)
- In order to upgrade the size of a plot you have to demolish it, then place a larger one, the act of placing a new plot/house will condemn your grandfathered houses on all shards on the account. You cannot reverse this process, you will have to either a. sell the condemned houses, or b. Demolish them. (see <font color=blue>Multiple Houses</font color=blue> and <font color=blue>The Condemned</font color=blue>)
- Your newly placed larger plot will become your primary house, and automatically refresh so long has your account is active. (see <font color=blue>Inactive Accounts</font color=blue>)
- Be sure to place during low traffic times. This could be early in the late night early morning time frame of the shard you play on. Make sure you have everything you need.
- Be sure to have tracking above level 20, so you can adequately track for people, this will give you a little assurance that you are safe for a few moments.
- One of the safest ways to upgrade a plot or house is to completely empty it. Or reduce it down to just a few crates, inside the crates put a stack of something that makes it weigh like 8 tons, so no one can just up and walk away with one. Make them search! Once you place a your plot secure the crates via the leap frog method.
Okay, I got a little ahead of myself. So, to upgrade a plot to a larger size, one must demolish the existing plot, this is not a move for the weak of heart, then using either #x# plots or older house designs, place a new one. If you have emptied your house of all add-ons, plants, water barrels, everything, then you shouldn’t worry about residue after demolishing a house. However if you decided to leave a few lockdowns (elevated via the fish steak death robe decay method) or a few add-ons like water barrels’ troughs, rugs,,ect. You are risking the ability to place a larger house, and in some cases the original house size. Clean up these to give you more of a chance of less problems.
When you demolish the house, the items left in the house will fall to the ground where they were at, if they were on the 3rd floor then they will stack on top of each other and the tile matching on the ground. Clicking on them once will release/unlock them then you can move them. HOWEVER, this does not need to be done for 98% of the items you’ll come across, the first time your test for a larger size actually works, they all will be moved under the house sign.
One thing to test for, and which I have seen be a issue, is when, has mentioned above, items that were elevated prior to the use of the home décor tool. These will appear to hang even thou the house has fallen, if you can, you will want to remove these prior to the demolish, if not, stand on the tile the item would have fallen to, then click the item, then drag it to your backpack, if you cant seem too do that, your not standing “under it”, the illusion is you will be a few tiles south of the item.
Any house add-ons that were left behind after a demolish can be axed, simply double click a axe then target the add-on.
Guildstones: Have the guild master move the guild stone to another house for the time being. Recently used guildstones cannot be moved by anyone but the guild masters and GM’s. This means if you demolish a house that had a Guildstone in it, and if it was used recently, then you cannot even replace the land with the same size house, you have to place around it or page a GM to move it. GM’s are pretty good at moving a guildstone that has become a problem for house upgrading or placements
=/=/=/=/
<font color=green>How to utilize the functions of a house.</font color=green>
=/=/=/=/
This is fairly simple, for this I'll point you to uo.com website.
=/=/=/=/
<font color=green>The basics of house placement rules.</font color=green>
=/=/=/=/
First lets start with the standard house rules you should know. We will focus on a few of them listed.
- Terrain must be even.
- Obstacle free outer perimeter of the house.
- 5 tiles free on the North and South side of the house.
- Things you normal cannot place a house foundation on.
- West and East side spacing
Okay a few basic no brains, you cannot place on water, mountains, trees, in caves.. ect.
So why is there hope for placing house?
Because houses are failing, new land has opened, people are moving..ect.
Even Terrain
To get a good understanding of what a foundation is, you can do this experiment, go to any house West or East side, and turn up your circle of transparency option to 200. then take a look at the house, you’ll notice the tiles of the house directly next to you are visible but beyond that you can see the terrain the house is on. If you walk completely around the outside of the house you will see the entire foundation. This foundation has to be placed on even terrain, no part of the foundation can be elevated higher/lower than another. However the inside foundation can be uneven to an extent.
Log cabins may have the advantage when placing over tough terrain with hills, maybe OSI intended this to be so, think on this, you have to walk up 2 or 3 tiles to get to the door, so the floor is a whole 2-3 tiles above ground.
Obstacle free outer perimeter of the house

If you look at the image above, the outer perimeter is in red, you must be able to walk this perimeter without being stopped by some object.
This perimeter has been known to be the beginning of a drop in a hill.
Tiles free on the North and South side of the house.
Also from looking at the above image, you have the 5 tile rule being shown in yellow. This area can have really anything in it, except for other houses, and some in game objects.
The blue is where some house combination allow placement. It is not a guarantee, but it may be a possibility. Below is an example of what I mean.

Here I am using a Villa and a Small Marble. The most important thing to remember is not to invade the 5 tiles directly to the South of the house or to the north with your house, nor should you invade the 1 tile directly East or directly West of the house. The Blue/Red tiles represent the mixture of the 1 tile to the EAST for the Marble and the 5 tiles to the North for the Villa, both houses are using the area to supplement their requirements.
Things you normal can’t place a house foundation on but can be within the footprint
If you cannot walk threw it, a foundation cannot be on it. That is pretty much the rule. Some flowers can also prevent a foundation from working also. If you’ve traveled around enough, you may see a foundation appear to be on top of the flower, however the flower graphic is simply overlapping the tile.
A thing to keep in mind, walk threw objects are not a 100% thing either way, try to place on top, and if that does not work, simply make the house foundation larger and cause the object in question to become part of the inside of the house where it is less of an issue.

This is a prime example of what I am meaning.. the picture above has circled the objects that can be inside the foundation.
Notice I have a rock of good size, a lot of flowers and a small hill. All of which fit nicely into the inside of a houses footprint.


These are some of the plants that can be within the footprint.
Since AoS, some people have also manage to place the small patches of crystals (not the large ones), into and right under the foundation of the house.
West and East side spacing
Take a look at Figure 1.1 and Figure 1.2
In figure 1.1 you can see the problem people are having, they think the gap in front of ghost Flippy is wide enough to walk through, while in fact it is not. They are not the only ones, the land survey tool used to say this is a valid spot, as long as all the other requirements were met.

Figure 1.1

Figure 1.2
Figure 1.2 is the correct spacing gap and it is a must to have. The only time you will see houses close like Figure 1.1p is in Felucca.
=/=/=/=/
<font color=green>How to find houses that are decaying, the art of IDOC Camping</font color=green>
=/=/=/=/
Yes even since the release of AoS, houses are still decaying, and what is even better, if you havent noticed allready some houses are showing there decay rate.
So which are, or are not?
Which are defenitly not. Primary Set houses.
Which are defenitly Decaying and showing. Condemned Grandfathered houses.
Which are showing the decay status but not decaying yet (not until phase 3) GrandFathered houses.
The decay status can be viewed by clicking a house sign. The Status will be something like, This house is like new, or slightly worn, fairly worn, greatly, and Indanger.
In the past a house would decay away in about 6-7 days. Now that time can vary due to how the house has gotten to its InDanger Status.
Three ways
- Owner of the account has stopped paying
- Owner has Condemned the house
- Owner has failed to refresh the house(after phase 3 starts)
If 1 is the case it should decay on the 15 day of inactivity. Sooner if Phase 3 is implemented.
IF 2 is the case is should decay within 5 days.
If 3 is the case, it should decay at normal rate, but can vary due to spawn and location of the area.
So if you find a house that is IDOC follow these steps, they can help.
=/=/=/=/
<font color=green>The Large Tower and the mistery of the wings.</font color=green>
=/=/=/=/
The questions have been asked many times. "'Can you explain the footprint of a large tower" or "'what is the deal with the wings" or perhaps you are thinking of buying a few houses near you and upgrading to a large tower. Well, you're not the first. This is to help you decide if you want to take the risk of upgrading. On this page we'll use a large tower as an example.
Let's first setup a tower's footprint by placing colored clothing around where the foundation should be, along with a few other tricks.
First I arrive and place the pieces of cloth all around the foundation of the house. (I call these Markers) Figure 6.1
I had to work a bit on the wings, the South side is easy until I try to figure out when to stop! How?
First I got up next to the wall on the East Side Corner
Figure 6.2 Notice how you can see inside of the tower, and that there is no support beam above me? Next I take 2 steps forward Figure 6.3 Now you can see the support beam of the wing! The support beam acts like the foundation does, It is picky about what can be under it. Next, I lay down a few Blue pieces of clothing to mark the area under the wing. But the question is how do I know where to stop? How do I know where the edge of the wing is? It's easy; I take one step forward.. Figure 6.4
Now I see the wing in its wholeness, my theory is this 'While I am under the foundation I will only see parts of the foundation. Once I'm out from under it I see all of the wing.' Using this theory I place my white pieces of cloth on the tiles going South to North, in other words, the tiles I'm standing on in the Figure 6.2 thru 6.4

Figure 6.1


Figure 6.2Figure 6.3

Figure 6.3

Figure 6.5
In Figure 6.5 I place blue markers under the west wing also. Now we take our markers to the Rook and Mark the Wings.
To the right on Figure 6.6 I have placed Yellow Markers for what I note has the floor of the east wing. I also placed Red markers on the outer foundation. When the tower is taken down, the theory is the yellow will fall on top of the inner Blue markers on the ground, the red should fall on the outer blue markers on the ground because those outer blue markers represent the outer foundation of the wing. Well when the tower was deeded the Yellow markers fell right where I thought they would, the Red markers however stayed where they where, due to being on the foundation and not on the floor.

Figure 6.6
The next step is re-deeding the house.. Even on the Test Rewards 1 Shard, the shard that has time warped every night, I felt nervous deeding the place... BUT I did!.
After deeding I had sort of a panic attack. Someone out of the blue showed up, and I wanted to deed the tower to see the stuff moved out of the way, so I was quick in taking pictures, and then I placed the house in the same spot. Kinda easy when the outline is already there.
Notice the Red Markers? They all got put under the sign, since they were 'floating' in the air, and did not fall to the ground.

Figure 6.7

Figure 6.8

Figure 6.9

This testing, laying of clothing and deeding, has created a footprint for us to use when placing a house. Although there are still some question has to what plants can be under the wings and on the white marker area, it is still useful just to know if you have the space or not. I took a picture of the ground after the house was deeded. I show this to you know, but with a lot of lines that represent the conclusions I came to.
Remember :
Don't test deeding your house while the server is saving. Wait until it has stopped saving and then try.

Figure 6.11
Unlike its smaller version, a small tower, the large tower is not a "perfect" square or rectangle. It is composed of rectangles. 3 to simplify.
Going from South to North we have
- he stairs leading to the front door
- The largest rectangle after the stairs that includes the wings foundation, known to me has the front half.
- The back part.
We can simply say that including the stairs and 'free for walking' tiles around foundation, a towers footprint is
26 West to East by 18 North to South (26x18)
But we do not live in the land of ample space. So let's take a closer look at the footprint.
The Black line is the outer foundation for a large tower, this is including the wings.
The Bright Green line is front side of the tower, the Blue is the back side.
You should consider the footprint to be the following : 26x9 + 18x7
The front side rectangle is 26x9 and the back side is 18x7
I've numbered it all for ya..
Heck you can even make your own outline in minutes. Just reference my picture for the inner corners and your set!
Figure 6.11 Legend
Black Line = Foundation
Black line surrounded by Blue = Inner Foundation
Clothing Squares Required the area be walk over able. (free walking area)
Clothing Squares with 2 Red Bars = Inner Required free walking area.
Clothing Squares with Black Dots = Grey area with Rules.
Green rectangle = Front side of tower
Blue Rectangle = Back Side of tower.
Yellow and Blue Clothing Squares = Defined Later.
A few rules to recap..
The foundation cannot have any house blocking terrain, this includes uneven terrain, some plants, most rocks, and the bumpy area of a fallen log.
The tiles directly outside of the foundation (the white markers) require that a person be able to walk through anything that might be on the square.
Other houses need to be clear of your tower by 5 tiles on the North and South facing walls, this rule applies to the wings also. If a house is on the same tile lines as your stairs are, (the middle 2 tiles on the stairs that are right in front of the doors) your tower will need to be 6 tiles away from the house, not 5.
Some ground objects that normally block house placement have been know to be under the clothing squares marked with black dots, such as small rocks and bushes.
