<p align="center"><font color="#800000" size="5">
A
tutorial for Simpose 8 & 9
</font><font size="3">
By: Justin Davis</font></p>
<p align="center"><font size="1">
Contents:
Creating/loading/Saving Libraries; Loading/Saving Poses
Pose Library: A group of related poses in a file ending in .psl</font></p>
<font color="#0000FF" size="4"><u>SimPose 8</u></font> <font
size="1">(**Note** You can only have one pose library loaded at a
time)</font></p>
<blockquote>
Applying a pose to your sim</p>
<blockquote>
First you must load the pose library before you can
apply a pose to your sim</p>
<font color="#0000FF">
Loading the Pose Library</font></p>
<blockquote>
Click
Static>Load Pose Library, select
the pose library from the pose folder and click
OK.</p>
</blockquote>
<font color="#0000FF">
Applying the pose</font></p>
<blockquote>
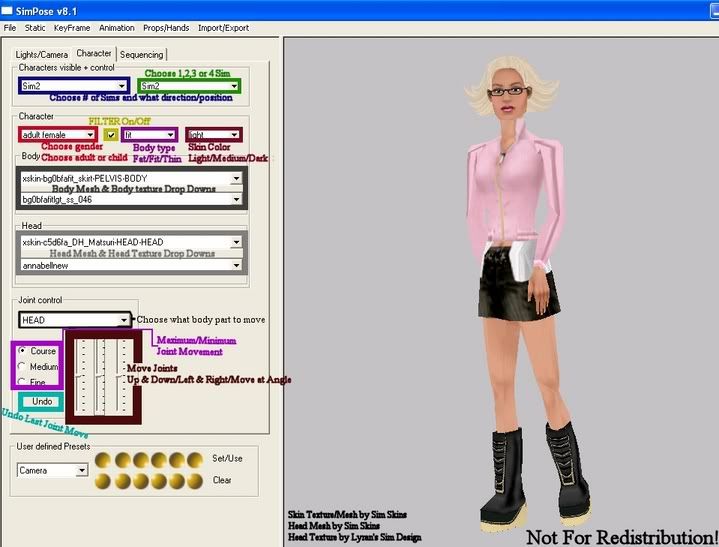
Make sure you have the correct sim selected by
clicking the
Character tab, and select the
correct sim from the "Characters visible +
control" drop-down menu. Click
Static>Select
Pose, and select the pose. If you choose to, you
may apply the pose to specific joints of the sim. To
do this click
add in the "Apply Pose
to" section and select the specific joints you
would like to apply to this pose. When selecting more
then one joint, hold down the
CTRL key on
your keyboard and select all the desired joints, and
click
OK. If you would like to just apply
the pose to all joints, simply select "ALL"
in the drop down menu, click
OK.</p>
</blockquote>
<font color="#0000FF">
Saving Your Poses</font></p>
<blockquote>
If you have not done so you need to create a new
pose library.</p>
<blockquote>
Creating a pose library:</p>
<ul>
[*]Click
Static>New Pose Library.
[*]Click
Static>Save Pose Library As.
[*]Type in a general name for the pose
library (remember this will contain a
group of your related poses, this is not
saving your created pose).
[*]Click
OK.
[/list]
Saving a pose:</p>
<ul>
[*]Before saving poses, make sure you load
the desired pose library by following the
steps in the
Loading Pose Library
section.
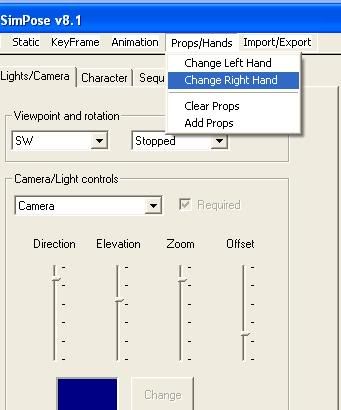
[*]After posing the sim click
Static>Save
Pose to Library
[*]Click
Add in the "Select
Pose" section and give the pose a
name.
[*]Click
OK. If you choose to you
may add comments about the specific pose
you are saving. Click
OK.
Continue posing and saving your poses the
same way.
[/list]
If you are done adding poses to this pose
library then click
Static>Save As Pose
Library select the pose library that you
created earlier and click
OK. </p>
</blockquote>
</blockquote>
</blockquote>
</blockquote>
<font color="#0000FF" size="4"><u>SimPose 9</u></font> <font
size="1">**Note** You can load more then one Pose Library;
however, only 4 Libraries can be loaded at a time, once you
exceed this a promter will appear saying 'The maximum number of
libraries have been loaded Replace " " ' click
OK
and it will replace the pose in the " " with the newly
loaded pose library.</font></p>
<blockquote>
Applying a pose to your sim</p>
<blockquote>
First you must load the pose library before you can
apply a pose to your sim</p>
<font color="#0000FF">
Loading the Pose Library</font></p>
<ul>
[*]Click
Static>Load Pose Library
[*]Select the pose library from the pose folder and
click
OK
[*]Click
Static>Choose Pose Library,
select the pose library, and click
OK.
[/list]
<font color="#0000FF">
Applying the pose</font></p>
<ul>
[*]Make sure you have the correct sim selected by
clicking the
Character tab, and select
the correct sim from the "Characters visible
+ control" drop-down menu.
[*]Click
Static>Select Pose, and select
the pose. If you choose to, you may apply the
pose to specific joints of the sim. To do this
click
add in the "Apply Pose
to" section and select the specific joints
you would like to apply to this pose. When
selecting more then one joint, hold down the
CTRL
key on your keyboard and select all the desired
joints, and click
OK. If you would like
to just apply the pose to all joints, simply
select "ALL" in the drop down menu,
click
OK.
[/list]
<blockquote>
<font size="1">**Note** When applying a pose to a
sim, a prompt may appear saying "The displayed
static pose has changed Save change to pose
library?" Simply click no as you do not want to
save over the current pose as yours maybe slightly
differnt then the saved pose ex. direction,
elevation, zoom, etc.</font></p>
</blockquote>
<font color="#0000FF">
Saving Your Poses</font></p>
<blockquote>
If you have not done so you need to create a new
pose library.</p>
<blockquote>
Creating a pose library:</p>
<ul>
[*]Click
Static>New Pose Library
[*]Type in a general name for the pose
library (remember this will contain a
group of your related poses, this is not
saving your created pose)
[*]Click
OK
[/list]
Saving a pose:</p>
<ul>
[*]Before saving poses, make sure you load
the desired pose library by following the
steps in the
Loading Pose Library
section
[*]After posing the sim click
Static>Save
Pose to Library
[*]Click
Add in the "Select
Pose" section and give the pose a
name
[*]Click
OK. If you choose to you
may add comments about the specific pose
you are saving. Click
OK.
Continue posing and saving your poses the
same way.
[/list]
If you are done adding poses to this pose
library then click
Static>Save As Pose
Library select the pose library that you
created earlier and click
OK.</p>
</blockquote>
</blockquote>
</blockquote>
</blockquote>
<p align="center"><font color="#800000" size="4">
Helpful
Links For the Eager Skin/Mesh Maker</font>
By JustinDavis</p>
Here are some links that can help you:</p>
Sims Skin Tutorial</p>
<blockquote>
http://compsimgames.about.com/gi/dy...Dskin%2D01.html</p>
</blockquote>
Customizing for the Sims</p>
<blockquote>
http://www.mallofthesims.com/resour...s.php?item=skin</p>
</blockquote>
General Mesh Tutorial</p>
<blockquote>
http://compsimgames.about.com/cs/th...a/makeskins.htm</p>
</blockquote>
Milkshape 3D (Mesh Creator Program With Help Download)</p>
<blockquote>
http://www.swissquake.ch/chumbalum-soft/</p>
</blockquote>
Bodywarp (Mesh Helper Program)</p>
<blockquote>
http://www.simprograms.com/index.shtml</p>
http://www.thesimsresource.com/programs.php</p>
</blockquote>
Here
is a link that contains links to many pages with skins and
meshes.</p>
Feel free to post any questions or comments.</p>

 ). Just copy and paste your