• Hail Guest!
    We're looking for Community Content Contribuitors to Stratics. If you would like to write articles, fan fiction, do guild or shard event recaps, it's simple. Find out how in this thread: Community Contributions
  • Greetings Guest, Having Login Issues? Check this thread!
  • Hail Guest!,
    Please take a moment to read this post reminding you all of the importance of Account Security.
  • Hail Guest!
    Please read the new announcement concerning the upcoming addition to Stratics. You can find the announcement Here!

In game screen shots

M

Muu Bin

Guest
I was hoping to take some screen shots of my old house before recustomizing to a new design. I'd like to incorporate some old ideas I have as well as borrow a few ideas from other house designs I have come across in-game. Would some kind soul out there be able to help me out in how to actually capture a screen shot in-game? I have seen quite a few methods on how to upload to Stratics and other sites - nothing yet on how to actually get those images.

Based on how tired I have been lately, the answer is likely a very straightforward and easy one; but we have a newborn and my brain is now addled from lack of sleep :gee:

Thanks in advance to any helpful replies.

M.B.
 

Skylark SP

Available Storage: 0
Stratics Veteran
Stratics Legend
Copying and pasting my old Screenies 101 tutorial:

A. Capturing the image

1.) First, open the built in Microsoft Paint utility in Windows (Start --> Programs --> Accessories --> Paint)


2.) Next, in the UO game window, when you want to make a screenie, simply press PrtScn (Print Screen). That will save the entire client area to the Windows clipboard.

3.) Switch to your paint program, click on the blank image area, and press Ctrl+V, which will paste the contents of the clipboard into Paint. You will likely get a popup, indicating that the image is larger than the default bitmap, and be asked if you want to resize it. Click Yes.

4.) Once the image is in the Paint active window, you can begin editing it. The first thing to do is crop it. There are a couple of ways to do this. The easiest in my opinion, that also gives the most control is this:

B. Editing and saving the image

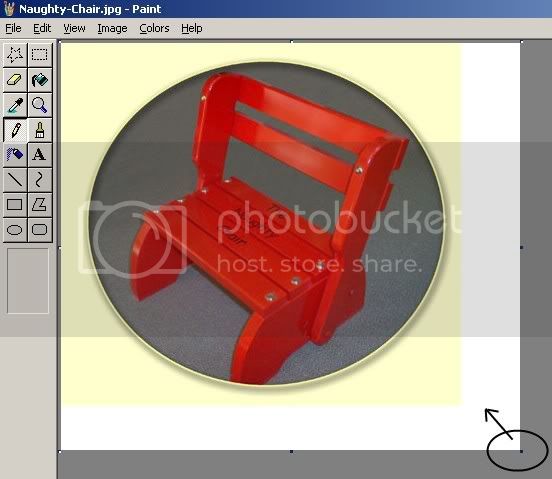
1.) Click the Select icon on the toolbar to the left of the screen (the dashed rectangle).

2.) Click on the image and drag the rectangle border to select the area you want.

3.) Press Ctrl+X to cut the image.

4.) Click File > New, do not save the old image when prompted

5.) Press Ctrl+V to paste your selection in the new paint window

6.) Crop out any excess white space by dragging the resize handles at the corners/edges of the image to the desired area


7.) Save your image as a jpg file (most compressed, while retaining highest amount of color information) by clicking File --> Save As, and then choosing JPEG in the Save as Type drop down box at the bottom

8.) Once you are done, you will need to place your image on the web to use it in posts. Some people use Photobucket (www.photobucket.com), which offers a free image hosting account with limited storage space. To embed an Internet hosted image in your post use the 'insert image' button above the reply box and enter the url in the dialogue box that comes up.
Alternatively you can upload the image from your pc by using the 'go advanced' button and then scrolling below the message box to the 'manage attachments' button, clicking on this gives you a dialogue box allowing you to browse your pc for the picture, after which click the 'upload' button. When your image has uploaded close the dialogue box and return to your post.

Note:
MS Paint does the job, but I recommend this utility: Paint.net (available from www.getpaint.net). It is an Open Source graphics editor, that is available at no cost. It has the simple interface of MS Paint, with some enhanced capabilities such as image layers, a few artistic effects, and it handles compression and file format conversions better than MS Paint. It is useful for both screenie editing, and making forum sigs.

Majorwoo made this screenie tutorial as well, which is a bit more step by step.

-Skylark
 
T

Tazar

Guest
Or if you play the enhanced client - just hit print-screen and it creates the screenshot and saves it for you. I forget where it files them, but someone in the EC-Beta Forum will know.
 
M

Muu Bin

Guest
Thank you both for your quick reply! Looking forward to getting my screen shots so that I can finish my house re-do. :thumbup1:
 

AtlanticVlad

Sage
Stratics Veteran
Stratics Legend
Taz you and your EC... you know this really is the worst part of the forums to try and sell that in =) haha Sooner or later you'll wise up or at least thats what I keep telling my self... =)
 
T

Tazar

Guest
Never! :p

See how much easier it was? lol

btw... great instructions Skylark. :)
 
T

Tazar

Guest
Also... my latest design looks fantastic in EC, but horrible in 2D. Sadly, 2D just can't handle some of the stuff I did. (literally - the screen cuts out leaving large black areas) :p
 
M

Muu Bin

Guest
Any chance of getting that stickied to the top of this forum? I'm pretty sure it was there a long time ago but possibly disappeared when things were "revamped" a few years ago?
 

hawkeye_pike

Babbling Loonie
Stratics Veteran
Stratics Legend
Or if you play the enhanced client - just hit print-screen and it creates the screenshot and saves it for you. I forget where it files them, but someone in the EC-Beta Forum will know.
If you do that, keep in mind that the screenshots don't show the lighting correctly (i.e., they don't show nights).

I personally prefer the very old UO Screenshot Utility, which still works perfectly, even for the Enhanced Client.
 
K

Kurgan

Guest
From an old post of mine.

First thing you need is a program for taking screen shots.
I am using Paint Shop Pro 7 (PSP7)
Setup PPS7 Captue Setup
Have it set to capture:

Full Screen
Delay Timer 3 Sec
Multiple Captures

Now press Capture now, and go back to walking around in UO.
Every 3 secs you will here a Ding sound, this is PSP 7 taking a screen shot.
Once you are done walking around. Goto a safe place to hang out. IE: House, Bank.

Next bring up PSP7 and stop it from taking pics.
Save your pics out as BMP, JPG, or GIF

Next edit those photos.
Crop them just to have the game screen.

Once done go to the link below and install this program.
Windows Live Photo Gallery
http://download.live.com/photogallery?wa=wsignin1.0

Once installed bring up the program called:
Windows Live Photo Gallery

To make a fully sticted photo follow these instructions.
Goto File
Include a Folder in the Gallery
Browse to your pic folder.

Once added choose your photo's that have the same common image in them.

Next goto Make
And choose
Create Panaramic Photo
Save your photo.
And you are done.

A nice image put together.
No more copy and pasting images together.

Added Photo In.


Skylark SP

Available Storage: 0
Stratics Veteran
Stratics Legend
Ooh thanks for the panoramic program tip, Kurgan...I've always had to painstakingly stitch screenies together on a large canvas to do that in the past!

-Skylark
 

Lord Clay Of Aquinas

Journeyman
Stratics Veteran
Stratics Legend
I use GreenShot which is free on sourceforge. It's usually the first link if you search on google for "Greenshot"

The feature that I like the most is; Greenshot allows you to take a screenshot of a selected area, and then you can keep taking shots of that same area again and again. So if you only want your 800x600 UO screen area, you capture that region first and then just keep taking shots of that same area as much as you want.
 
C

Cat Crimson

Guest
All this seems very complicated - all I've ever done to get a screenshot ( but then I've only ever used 2d or 3rd Dawn clients ) is use PrtScreen then paste into Irfanview ( freeware and a basic but VERY handy little graphics programme ) and save it as a jpg.
 
Top